|
|
|
Categories
|
|
Information
|
|
Featured Product
|
|
|
 |
|
|
There are currently no product reviews.
 ;
Great quality copy, right what I was looking for, all I need to fix my radio.
Thanks
;
I BOUGHT A PAIR OF INFINITY VINTAGE SPEAKERS THAT REQUIRED TO BE REPAIRED AND THE ELECTRONIC TECHNICIAN ASKED ME FOR THE SERVICE MANUAL.
I TRIED TO GET IT AT THE MANUFACTURER'S SITE WITH NO SUCCESS, SO I STARTED TO LOOK FOR IT IN THE WEB FOR A LONG TIME, UNTIL I FOUND THE SERVICE MANUAL IN THIS EXCELLENT SITE "OWNER'S MANUAL.COM".
NOW I HAVE MY SPEAKERS WORKING AND ENJOYING THE MUSIC I LIKE.
THANKS TO "OWNER`S MANUAL.COM" I RECOMMEND THIS SITE TO EVERYONE.
;
Very quick response. Very good and accurate print quality of the scanned document.
 ;
The service manual was very usable and clear enough to see the individual values of all of the components (unlike some of the service manuals I have gotten in the past from web sites similar to this one). The price was right and the information was greatly appreciated. It helped me with an otherwise very difficult repair. It was much needed and appreciated. A faster turn around on my order would be nice, but I understand the constraints on your staff's time. Thank you for your service.
;
Excellent manual. Helped me out with disassembling and troubleshooting my projector.
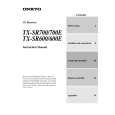
TX-SR600/E ADJUSTMENT AND CONFIRMATION PROCEDURES 1
Idling current adjustment Before Idling adjustment, turn the trimming resistors R6040 to R6045 to counter clockwise. Connect the DC voltmeter to sockets P6080 to P6085. After turn POWER to ON, adjust the trimming resistors R6040, R6041 and R6042 so that the reading of voltmeter becomes 2.5 mV. (Front and center channels) Adjust the trimming resistors R6043, R6044 and R6045 so that the reading of voltmeter becomes 1.5 mV. (Surround and surround back channels) After adjustment, attach the top cover. Confirm the voltage of points above after about five minutes. Front and center channels When less than 10.0 mV, readjust the resistors above so that the voltage becomes 10.0 mV. When 10.0 mV to 12.0 mV, you are not necessary to adjust. When more than 12.0 mV, readjust the resistors above so that the voltage becomes 12.0 mV. Surround and surround back channels When less than 7.0 mV, readjust the resistors above so that the voltage becomes 7.0 mV. When 7.0 mV to 9.0 mV, you are not necessary to adjust. When more than 9.0 mV, readjust the resistors above so that the voltage becomes 9.0 mV. Note: No load and No signal
6 J P L 6 P6840 JL6805A 4
J L 6 9 5 2
9 5 1 A
P955A
L
R
P6906
C
LS
ID+
RS
SB P6085 P6931A JL6953A
ID-
ID-
ID+
ID+
ID+
ID-
R6040
P6080
R6041
P6081
R6042
P6082
R6043
P6083
R6044
P6084
R6045 ID+ ID-
0A
1 4
JL6804A JL6803A
8
2
ID-
B
P997A
A
P931
Confirmation of protection circuit 1. Confirmation of operation of speaker relay Confirm that the speaker relays turn ON approximate. 5 seconds after the power switch is turned ON. Confirm that the speaker relays turn OFF immediately after the power switch is turned OFF. 2. Confirmation of DC detection circuit Press and hold down CD button, then press STANDBY/ON and DISPLAY buttons to set the unit to "Test-1" mode. After "Test-1" on the FL tube light on, press VIDEO 1 button to set the unit to "Test-1-00". Apply DC 1.5 to 3V to DVD INPUT terminal with no load. Confirm that the speaker relay turns OFF. Apply DC -1.5 to -3V to DVD INPUT terminal with no load. Confirm that the speaker relay turns OFF. Caution: Don't apply DC voltage more than 1 sec..
J L 6
P6072A ID+
P6000A
P6011A
P6001A P6301
P6073A
P6002A
P6003A
P6004A
ID-
P6005A
|
|
|
> |
|