|
|
|
Categories
|
|
Information
|
|
Featured Product
|
|
|
 |
|
|
There are currently no product reviews.
 ;
The manual was complete and of great quality. Originally a tri-lingual file, I first received only one language. After a note to owners-manuals.com, I quickly received the remaining languages... Great service, definitely worth it.
;
Thank you for providing this manual and at low cost.
The Philips scope is of excellent quality, longevity and build and had a couple of faults
when it was passed to me. Having the CCT diagrams is a blessing.
I have fixed the problems and also modded the scope to my requirements.
I have built a 24v Li-Ion pack for portable use from old but good laptop batts.
it is working beautifully and I am well pleased. Keep up the good work Guys.
 ;
manual was very helpful in learning how to propery use my washer. I could not find this manual anywhere else.
;
Awesome quality manual. You really saved my bacon with this one. Was looking for some specific information with regards to my "new" vintage VCR that didn't come with the owners manual. This site is truely a goldmine of available manuals. The quality of the scans are top notch.
Thank-you so much for this awesome manual. If you're looking for this Sony SL-HF400 owners manual, this is the one you NEED to buy. Definitely worth the money.
;
The manual was made available promptly. I is a clean scan of the original. I had no problem downloading it. The scan was well centered and cleanly formatted. It is as good a product as can be had without being the original document.
English
Listening to Auxiliary Equipment
You can listen to a turntable or other auxiliary equipment1 s )LUVW#PDNH#VXUH#WKDW#WKH#H[WHUQDO#HTXLSPHQW#LV#SURSHUO\#FRQQHFW0 HG#WR#WKH#6\VWHP1#+6HH#SDJH#81,
s Start playing the auxiliary equipment. 3. s Adjust the VOLUME control to the desired 4.
listening level.
s Apply sound effects, if you wish. 5.
s s
3UHVV#WKH#$+%#6XSHU#352#EXWWRQ#WR#UHLQIRUFH#WKH#EDVV#VRXQG1 3UHVV#WKH#%$66275(%/(#EXWWRQ#WR#FRQWURO#WKH#WRQH1#+6HH#³7RQH# &RQWURO´#RQ#SDJH#:1,
s Set the VOLUME to minimum position. 1. s Press the AUX button. 2.
:KHQ#WKH#6\VWHP#LV#LQ#6WDQGE\#PRGH/#WKH#6\VWHP#LV#DXWRPDWL0 FDOO\#WXUQHG#RQ1# #³$8;´#DSSHDUV#RQ#WKH#GLVSOD\1
To exit AUX mode <RX#ZLOO#DXWRPDWLFDOO\#VZLWFK#RXW#RI#$8;#PRGH#ZKHQ#\RX#VHOHFW RWKHU#VRXUFH1 Note: For operation of the auxiliary equipment, refer to its own Instructions.
s Using the Timers s
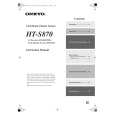
REMOTE CONTROL RM-RXU5500R
DIMMER
SLEEP
SLEEP
DISPLAY FM MODE AHB. AUTO SUPER PRO PRESET AUX CD
PROGRAM RANDOM
REPEAT
BASS
TREBLE
CANCEL
UP
Timer indicator SLEEP indicator
A
MI SY CR UX-5500 R NT O CO MPO N E
SET DOWN
PTY/EON
DISPLAY MODE
E
M
L T U
R
4 ¢
S T
PTY/EON DISPLAY MODE SLEEP DOWN MULTI CONTROL UP CLOCK
MD
/TAPE
TUNER BAND
CD
CLOCK SLEEP
OPEN/CLOSE AUX
MD/TAPE
TUNER BAND
CD
VOLUME
TIMER/SNOOZE
SNZ indicator
TIMER/ SNOOZE
:KHQ#WKH#6\VWHP#LV#LQ#XVH/#WKH#GLVSOD\#VKRZV#RWKHU#LWHPV#DV#ZHOO1 )RU#VLPSOLFLW\/#ZH#VKRZ#KHUH#RQO\#WKH#LWHPV#GHVFULEHG#LQ#WKLV#VHFWLRQ1 7KH#WLPHUV#OHW#\RX#FRQWURO#OLVWHQLQJ#IXQFWLRQV#DXWRPDWLFDOO\1
s Press the CLOCK button. 3.
7KH#VHOHFWHG#WLPH#LV#VHW#DQG#WKH#VHFRQGV#VWDUW#FRXQWLQJ#IURP#31 CAUTION: If there is a power failure, the clock loses its setting after about 20 minutes. The display shows �0:00� and blinks, and the clock must be reset. Note: 7KH#FORFN#PD\#JDLQ#RU#ORVH#RQH#WR#WZR#PLQXWHV#SHU#PRQWK1#
Setting the Clock
<RX#FDQ#VHW#WKH#FORFN#ZKHWKHU#WKH#6\VWHP#LV#RQ#RU#RII1 Notes: � 7KH#FORFN#PXVW#EH#FRUUHFWO\#VHW#IRU#WKH#WLPHUV#WR#ZRUN1 � The procedure must be completed within two minutes. Otherwise, the setting is cleared and must be repeated from the beginning.#
DOWN MULTI CONTROL UP
Setting the Daily Timer
You can set the Timer whether the System is on or off. Once you have set the Daily Timer, the timer will be activated at the same time every day. It can be cancelled and re-activated whenever you wish. The Timer indicator on the display shows when the Daily Timer you have set is in effect. Note: Perform each setting within 30 seconds. Otherwise, the setting is cleared and the procedure must be repeated from the beginning.
+IRU#5#VHFRQGV,
s Press the CLOCK button on the Unit for 1.
more than two seconds.
7KH#FORFN#UDSLGO\#EOLQNV1
s
2. Press the 4 or ¢ button on the Unit to set the time.
Pressing the ¢ button moves the time forwards and pressing the 4 button moves it backwards. Hold down the button to move the time in 10-minute intervals1
s Press the 1.
button to turn on the System.
14
|
|
|
> |
|