|
|
|
Categories
|
|
Information
|
|
Featured Product
|
|
|
 |
|
|
There are currently no product reviews.
 ;
Complete service and operation manual. All schematics are there, all circuit boards AND add-on boards. Including exploded views ,component names and specifications. Also electrical and mechanical adjustment procedures are in this manual. This manual also covers the more advanced BR-S811E unit. Scan quality is fair and usable.
 ;
High quality scan of original Service Manual. Everything´s fine!
;
Good scan of the original service manual. All schematics and adjustment procedures are there. It helped me to fix a long lasting problem with the tracking circuitry. The manual also includes the supplementals 1,2 and 3. Included are; electrical schematic's , pcb layout's, mechanical drawing's and exploded views, disassembly manual and maintenance procedures. 236 pages.
;
The Service Manual received was helpful. The electronic information is exactly what I needed.
I recomend all of my friends about this technical page.
;
High quality scan of service manual. I am satisfied!
Alignment and Adjustment
5-3 Head Switching Point Adjustment
1) Playback the alignment tape. 2) Press the �SW701� button on Main PCB with pincers to set the adjustment mode. (See Fig. 5-2 ) 3) Press the �SP/LP� button of remote control then adjustment is operated automatically. (See Fig. 5-1) 4) Turn the Power off.
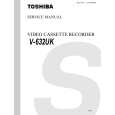
5-4 NVRAM Option Setting
1) NVRAM Option is adjusted at production line basically. 2) In case Micom (IC601) and NVRAM (IC605 ; EEPROM) is replaced, be sure to set the corresponding ooption number of the repaired model. (If the option is not set, the unit is not operated.) 1) Press the �SW701� button on Main PCB to set the adjustment mode. (See Fig. 5-2) 2) Press the �MENU� button on the remote control about 5 seconds then option setting display is appeared. (See Fig. 5-14) 3) Select the option number (See Table 5-2) of corresponding model with �CURSOR� button on the remote control. 4) If selecting the option number is completed, press the �OK� button of remote control. (If �OK� button is pressed, the selected number is changes reversed color. ; See Fig. 5-14) 5) Press the �MENU� button of remote control again to store the option number. (�PLEASE WAIT� is displayed for a second as shown Fig. 5-15 and this setting is completed.) 6) Turn the Power off.
01 09 17 25 33 41 49 57 65
02 10 18 26 34 42 50 58 66
03 04 05 06 07 08 11 12 13 14 15 16 19 20 21 22 23 24 27 28 29 30 31 32 35 36 37 38 39 40 43 44 45 46 47 48 51 52 53 54 55 56 59 60 61 62 63 64 67 68 69 70 71 72 CNG : OK SAVE : MENU
Fig. 5-14 <Table 5-2>
01 09 17 25 33 41 49 57 65
02 10 18 26 34 42 50 58 66
03 04 05 06 11 12 13 14 19 20 21 22 27 28 29 30 35 36 37 38 43 44 45 46 51 52 53 54 59 60 61 62 67 68 69 70 PLEASE WAIT
Fig. 5-15
07 15 23 31 39 47 55 63 71
08 16 24 32 40 48 56 64 72
MODEL V-632UK
OPTION NUMBER 4, 5, 6, 8, 9, 10, 11, 12, 14, 18, 25, 26, 29, 33, 38, 40, 41, 46, 49, 50, 53, 60, 61, 62, 63, 72
5-8
Toshiba
|
|
|
> |
|