|
|
|
Categories
|
|
Information
|
|
Featured Product
|
|
|
 |
|
|
There are currently no product reviews.
 ;
Finally, i found one website, where i can download this service manual , and fix my hifi. The service manual is very good, and easy to download and to print.
 ;
Complete and very useful. Could have benefited from a little higher resolution on the schematic and layout diagrams for improved legibility.
;
Great Service Manual, Very Complete, as advertised, Perfect, Thanks!
;
Good quality service manual.It has helped me to fix my FV1800,particularly for replacing the dial cord.The scheme is on A3 format and very readable.Thank.Olivier.
;
This manual is complete and very readable.It was a great help for my two ICF5800L.The first one had the dial cord broken,and without the service manual it is impossible to replace it.Thank.Olivier.
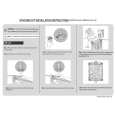
5-2. Replacing the CPU
1. Removing the CPU
1 Insert a flat-blade screwdriver into the notch as shown in the illustration and rotate it so that the protrusion comes to the lock release position. 2 Pull the CPU gently upward to lift it out of the CPU socket.
2. Installing the CPU
1 Align the triangle reference mark of the CPU with that of the CPU socket and insert all the pins of the CPU to the corresponding holes of the CPU socket. 2 While pressing the two positions marked by a, insert the flat head (-) screwdriver into the specified position and rotate the screwdriver to the LOCK position.
1
2
1 CPU Lock position 2
2 CPU Lock release position Reference marks 1
Lock release position
CPU socket
Lock position
CPU socket
NOTE: Rotate a flat-blade screwdriver to the lock position securely. If not, the operation of the CPU may become unstable.
Confidential
VGN-A50B/A60B/A60PS/A60S/A70P/A70PS/A70S (J) VGN-A130/A130B/A130P/A170/A170B/A170P/A190 (AM) VGN-A115B/A115S/A117S/A195EP/A195HP/A197VP/A197XP (EU) VGN-A11C/A13CP/A15CP/A15GP/A15LP/A17GP/A17LP/A17SP/A17TP/A19CP (AO)
5-2 (END)
|
|
|
> |
|