|
There are currently no product reviews.
 ;
downloaded next day , manual is very helpful , fast and easy
 ;
This Service Manual was exactly what I needed to repair my Philips TV. The purchase was convenient and I received the manual at the same day I paid for it.
;
Very pleased with the whole process. Great commication and very easy instructions to order and to download the manual.
;
It's a good manual, this one it's a scan from the original factory service manual, great quality 100% readeable. definetely it worths what I paid for.
;
A good manual! fast service and good qualityi for pdf document.
thanks!
VL-A111S/H/E/AH131S/H/E VL-AH151S/E
VL-E990E
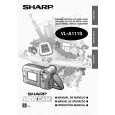
Claw C Claw B View E Claw A Claw D View F
Note: When fixing the cassette compartment lid, first engage the claws A and B, and then engage the claws C and D, confirm that the four claws (A, B, C and D) of the cassette compartment lid are securely engaged as shown in the view above. <11. Disassembly of the LCD panel>
(2)
Claw (A) (1)
Claw (A) Reflection sheet Light guide plate Diffusion sheet Prism sheet Lugs Lugs
(3)
Claw (B) Disengage the claw, and remove the LCD panel.
(C)
(2)
(4)
Arm(E)
FPC
Arm(D)
1. Disengage two claws (A), and remove the lamp inverter unit (1) from the LCD holder (2). 2. Remove the sheets from the LCD holder (2). 3. Pull the LCD glass retaining (3). 4. Remove the FPC from Arm(D) and (E). 5. Disengage the claw (B), and slide the LCD panel (4) in the (C) direction to remove the LCD holder (2). Note: When handling the prism sheet, diffusion sheet, light guide plate and reflection sheet do not touch any parts other than lugs and sides. With the light guide plate and reflection sheet between reflectors of lamp, install them together with the lamp ass'y.
8
|