|
|
|
Categories
|
|
Information
|
|
Featured Product
|
|
|
 |
|
|
There are currently no product reviews.
 ;
I've been looking for a copy of the original user/owner manual. Just what the doctor ordered, thank you.
;
the manual was very helpful thank you very much no one else was able to help me thanx
;
This is an excellent handbook. We had no information on the appliance until we obtained this and are now able to use the appliance to its full potential. Strongly recommended.
;
Very happy to find this from owners-manual.com and the enclosed spec sheet as well.
Not longer available from Sony.
;
The Owner's manual was very helpful. The WEGA is about 35 years old and needed repair.
Your Website is pretty good und easily to handle.
Thank You
Carl-W. Lohmann
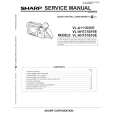
Using the Hand Strap and the Lens Cap 1
Open the hand strap flap (Q) and grip strap (W).
Hand strap flap Grip strap
Notes: � Always replace the lens cap on the lens when the VIEWCAM is not in use. � Attach the lens cap to the hand strap so it will not get in the way during recording.
Attaching the Shoulder Strap 1 2
Pass your hand through the hand strap and put your thumb close to the Power Zoom control. Then pull the grip strap tight until it fits snugly, seal the Velcro® closures (Q), and close the hand strap flap (W). Hold one end of the strap and thread it through the loop on the left side of the LCD screen. Loosen the strap in the buckle, then feed the end of the strap through the buckle, as shown. Draw the strap in the direction of the arrow to secure. Use the same procedure to attach the other end of the strap to the loop on the lens side.
Lens side
2 3
4�6
Caution: � Do not swing the VIEWCAM by the hand strap.
LCD screen side
1
4
Attaching and Removing the Lens Cap
When attaching or removing the lens cap, press both tabs on the sides of the cap.
Press both tabs.
2
Buckle Buckle
5
Preparation
3
6
14
|
|
|
> |
|