|
|
|
Categories
|
|
Information
|
|
Featured Product
|
|
|
 |
|
|
There are currently no product reviews.
 ;
I had a problem with the mains transformer, I did not know the voltages on the secondary, this manual helped me to solve this problem, thanks for the manual!
;
Great manual, great quality copy, complete parts reference and scematics, Thank you
;
Very good as always. Also this manual appears clear and well processed. I know it will help me to work on this TV. Thank you a lot! Matteo
;
complete wiring diagram, without the part list. high quality copy. thanks for promptly.
;
Well done scan of a useful manual. It will be useful in my workbench!!
VL-NZ10S/H/E
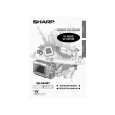
7-4. Running rough adjustment
(With cassette controller) 1) Su, Tu guide roller height adjustment <Method and description> (1) Loosen the guide roller lock screw, then tighten loosely so that the roller turns easily. (2) Replay an alignment tape, and adjust the Sup, Tu guide roller so that the envelope sides of entrance and exit are flat. (3) Perform ± 1/4 shift, then, as in the above case, adjust until the envelope becomes flat. * If running is difficult for the entrance changed, turn the T roller to counterclockwise 180°. (refer to Fig. 1)
NG ±1/4 shift Entrance side Normal Exit side NG ±1/4 shift
Turn to 180° T roller
Fig. 1
2) Check of V/SR envelope wave form <Method and description> (1) Confirm that the envelope waveform peaks in V/SR mode are uniform. (2) If they are not uniform, fine-adjust the guide roller and the Tu guide. 3) Check of tape wrinkles <Method and description> (1) Check that the tape is not distorted between the Tu guide and pinch in the PB mode and the V/SR mode. -If crease is found, make an adjustment in the range of ±180°. -After adjustment apply Screw Lock.
Pinch roller
Adjust so that A
�
�
B.
A
B
Wrinkles Tu guide
Deformation
Deformation
4) Check the rising time of the envelope wave form <Method and description> (1) Check the rising time of the envelope when switching from V/SR mode to PB mode. (Within 5 sec) (2) Check the rising time of the envelope when switching from STOP mode to PB mode. (Within 5 sec)
7-5. Final running adjustment
(With cassette controller) 1) Adjustment of Sup and Tu guide roller height <Method and description> (1) Perform ± 1/4 shift, then if the envelope wave's ratio of MAX. to MIN. are 60% or less, adjust again the height of guide roller. (Refer to Fig. 2) (2) Finally adjust the lock screw of Sup and Tu guide roller. (3) Once perform unloading and then loading to set the PB mode, and make sure that the envelope waveform does not change. 2) Adjustment of playback SWP <Method and description> (1) Playback the alignment tape for switch point adjustment. (2) Perform SWP automatic adjustment with adjustment remote control. * When replacing the mechanism and drum, adjust the phase and equalizer using the adjustment remote control. (Refer to "9. ADJUSTING THE ELECTRICAL CIRCUITS".)
Fig. 2
12
|
|
|
> |
|