|
|
|
Categories
|
|
Information
|
|
Featured Product
|
|
|
 |
|
|
There are currently no product reviews.
 ;
A very good complete archive, i am very satisfied for document.
 ;
The Service Manual received was helpful. The electronic information is exactly what I needed.
;
The Manual was perfect.
The deliverie was perfect.
Thanks
;
Found website easy to use and manual very clear. First class service
;
The quality is quite good and clear. Nothing of the informations inside is lost during the digitalizing process
VL-Z7S/H/E/Z7E-A/Z7E-W VL-Z8H
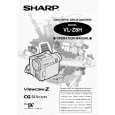
3. DISASSEMBLY OF THE SET
3-1. Procedure for disassembling the cabinet
Note: Before removing the cabinet, turn OFF the power and make sure that the battery is not connected. 1.
· Remove the screw ((s) XiPSF14P06000). · Remove the shoe cover by sliding it frontward, remove the screw ((f) XiPSF17P04000) and remove the shoe terminal cover. · Remove the screw ((b) XiPSN17P03000). · Open the LCD panel 90 degrees and remove the two screws ((x)LXHZ0050TAFN). · Remove the two screws ((c)XiPSN17P04000) and remove the KS camera front cover by pulling it frontward.
LCD panel f Shoe terminal cover x b x
Shoe cover
s
c c KS camera front cover
2.
· Disconnect the connector of the KS camera front cover. · Disconnect the two LCD tilt FPCs of the liquid crystal panel. · Remove the two screws ((r) XiPSN20P08000) and remove the LCD panel. · Remove the screw ((p) LX-HZ0063TAFN) and screw ((q) XiPSN17P06000) that hold the camera L cabinet, open the terminal cover and remove the three screws ((b) XiPSN17P03000).
r r LCD panel
q p Camera L cabinet b
b LCD tilt FPC b
Terminal cover
Connector KS camera front cover
3.
· Disconnect the hot shoe FPC of the hot shoe and remove the camera L cabinet. · Remove the screw ((c) XiPSN17P04000) and remove the KS camera bottom cover. · Disconnect the strobe FPC, remove the two screws ((a) XiPSN17P02000) and remove the strobe unit.
Hot shoe FPC
Camera L cabinet
Precautions in servicing the strobe unit Once put in the card mode, the main condenser of the strobe unit stays still electrically charged. If touching the strobe unit or its nearby parts, you may get an electric shock. To avoid this, connect a 7 k� resistor (300-V withstand voltage) across the main condenser for about 10 seconds. The condenser will be discharged.
Ã¥
a
a Strobe unit Strobe FPC KS camera bottom cover c
4
 $4.99 VL-Z8H SHARP
Owner's Manual Complete owner's manual in digital format. The manual will be available for download as PDF file aft…
|
|
|
> |
|