|
|
|
Categories
|
|
Information
|
|
Featured Product
|
|
|
 |
|
|
There are currently no product reviews.
 ;
This manual is very useful because it presents the technical specifications of the cd player, including the manufacturer of the reader, this helps if you need to replace it. It also displays the settings and layout of the circuit.
;
Manual was a good representation of service infomation for the EWV404. It worked well for my repair.
 ;
Great quality copy, right what I was looking for, all I need to fix my radio.
Thanks
;
I BOUGHT A PAIR OF INFINITY VINTAGE SPEAKERS THAT REQUIRED TO BE REPAIRED AND THE ELECTRONIC TECHNICIAN ASKED ME FOR THE SERVICE MANUAL.
I TRIED TO GET IT AT THE MANUFACTURER'S SITE WITH NO SUCCESS, SO I STARTED TO LOOK FOR IT IN THE WEB FOR A LONG TIME, UNTIL I FOUND THE SERVICE MANUAL IN THIS EXCELLENT SITE "OWNER'S MANUAL.COM".
NOW I HAVE MY SPEAKERS WORKING AND ENJOYING THE MUSIC I LIKE.
THANKS TO "OWNER`S MANUAL.COM" I RECOMMEND THIS SITE TO EVERYONE.
;
Very quick response. Very good and accurate print quality of the scanned document.
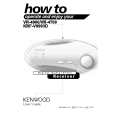
VR-4080-B/4090-B/4700/4900
DISASSEMBLY FOR REPAIR
HOW TO REMOVE THE FRONT PANEL AND THE MOTOR.
1. Take out the connectors (1) {X07,CN1/X13(CN7,CN8)} and the AC connetor(2). 2. Take the lead (3) out of CN301 on X11(A/4) PCB. 3. Take out the screws (4) and (5). 4. The front panel can be separated by removing 2 hooks (6) on the sub panel. 5. To separate the motor from the front panel, remove the screws (7).
MOTOR
2
AC CONNECTOR X07,CN1
1
1 1
7 x5 4 4 x5
X13
(G/8)
X25
CN8
CN7
H/P PCB
3
X11
(A/4)
CN301
6 x2 HOOK 5 x5 5
HOW TO REPLACE THE POWER TRANSISTOR.
1. The rear panel can be separated by removing screws (1) on the rear panel. 2. Take the AC connector out of CN2 on the X07(C/7). 3. To separate the chassis from bottom chassis, remove the screws (2). 4. Remove CN21 and screws (3) on X13(C/5). 5. Remove screws (4 to 7). 6. The fan motor can be separated by removing screws (8) and the connector (CN12) on X07 PCB. 7. Take the PCB X25(B/9), X11(C/4)} out of X07. 8. To separate the main PCB (X07) from the bottom chassis, remove screws (0). 9. Set up the PCB as figure (-). 10. Replace the defective transistors.
7 7 x2 7 6 6 8 x9
(C/5)
5
(C/9)
X25
X05-5130-11
4
X13
CN21
3 x2
3 x2
9
X07 CN12
2 2 2 2
2
2
2
X07-3150-10
(A/5)
11 10 10 10
CN2 CN14
10 10
X07
(C/7)
CN6
(B/9)
X25
X11
(C/4)
10 x3
1 x70
5
|
|
|
> |
|