|
There are currently no product reviews.
 ;
I really like this manual and it's reliable.I found and bought easly.thank you.
;
Thank you very much. the Instruction corresponds to my expectations. Sent it in time. I don't regret that paid money.
;
Good quality. Quick service. I recommend to everyone.
;
Very good quality scan of the document. I am very pleased with what I got.
;
PDF Contains
Technical Data, Mechanical data, Detailed Circuit diagram with components value, PCB layout. Actual PCBs Print. Component List, Spare parts code list and Input output detail. It cover LBB1211, LBB1212, LBB1213, LBB1216, LBB1217.
It is the actual Service Manual for SQ10
4 July 1995
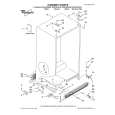
INSTALLATION PROCEDURE
9. Installing the Ink Cartridge a. Open the front door and lower the ink holder. b. Remove the ink cartridge cap. c. Insert the ink cartridge into the ink holder and return the ink holder to the original position. d. Close the front door. 10. Idling a. While holding down the "0" key on the operation panel, press the Reset key. b. If + D blinks on the operation panel, repeat the above procedure. 11. Test Printing a. Adjust the original guide to match the original size. b. Place an original face down. c. Input the desired number of prints with the number keys and press the Master Making key. NOTE: With a new machine, the master paper misfeed indicator + F blinks because there is no master yet on the drum. Press the Reset key, then press the Master Making key. d. After one sheet of paper is delivered, make prints at the lowest print speed (1) until the print image density stabilizes. Use a test chart to check for changes in the image density. e. Check the copy quality after the image is stabilized.
C224I510.img C224I509.img
C224I511.img
3-5
Installation
 $4.99 VT2200 RICOH
Owner's Manual Complete owner's manual in digital format. The manual will be available for download as PDF file aft…
|