|
|
|
Categories
|
|
Information
|
|
Featured Product
|
|
|
 |
|
|
There are currently no product reviews.
 ;
Excellent service manual, the only known point of note is the alignment of improvability scanned pages within the pdf page. The resolution is good.
;
I was very glad recieving the service manal from You. Additionaly very fast. Extremaly nice servicing. Thanks very mach! Now my GX-220 working better, than it was made. Alexander from Moscow, Russia/
;
Sweet! I won the item on eBay and couldn't adjust the geometry or even keep a steady picure. This guide has the full schematics (not available anywhere else as far as I could tell), and was a bargain for the wealth of knowledge it contains. I hooked it up to my testing equipment, tweaked a few potentiometers and got it playing videogames in no time. Thanks!
;
It was just what I need to fix my old BMW's CD player. Very convenient also. Thank you.
;
Great Manual! It contains all the wiring schematics and mechanical exploded views that are essential for service and repair. I was surprised I even found this for such an old machine. Only wish I knew of this site many years ago.
ELECTRICAL ADJUSTMENTS
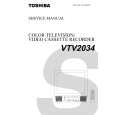
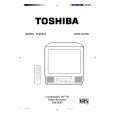
2-10: OSD HORIZONTAL 1. Using the remote control, set the brightness and contrast to normal position. 2. Activate the adjustment mode display of Fig. 1-1 and press the channel button (31) on the remote control to select "H POS OSD". 3. Press the VOL. UP/DOWN button on the remote control until the difference of A and B becomes minimum. (Refer to Fig. 2-2) 2-13: BRIGHT CENT 1. Receive the PAL black pattern*. (RF Input) 2. Using the remote control, set the brightness and contrast to normal position. 3. Activate the adjustment mode display of Fig. 1-1 and press the channel button (17) on the remote control to select "BRIGHT CENT". 4. Press the VOL. UP/DOWN button on the remote control until the screen begin to shine. 5. Receive the PAL black pattern*. (Audio Video Input) 6 Press the AV button on the remote control to set to the AV mode. Then perform the above adjustments 2~4. *The Black Pattern means the whole black raster signal. Select the "RASTER" of the pattern generator, set to the OFF position for each R, G and B. 2-14: CONTRAST CENT 1. Activate the adjustment mode display of Fig. 1-1 and press the channel button (20) on the remote control to select "CONTRAST CENT". 2. Press the VOL. UP/DOWN button on the remote control until the contrast step No. becomes "37". 3. Receive a broadcast and check if the picture is normal. 4. Press the AV button on the remote control to set to the AV mode. 5. Activate the adjustment mode display of Fig. 1-1 and press the channel button (20) on the remote control to select "CONTRAST CENT". 6. Press the VOL. UP/DOWN button on the remote control until the contrast step No. becomes "38". 7. Receive a broadcast and check if the picture is normal. 2-15: COLOR CENT 1. Receive the PAL color bar pattern. (RF Input) 2. Using the remote control, set the brightness, contrast and color to normal position. 3. Connect the oscilloscope to TP804. 4. Activate the adjustment mode display of Fig. 1-1 and press the channel button (23) on the remote control to select "COLOR CENT". 5. Adjust the VOLTS RANGE VARIABLE knob of the oscilloscope until the range between white 100% and 0% is set to 4 scales on the screen of the oscilloscope. 6. Press the VOL. UP/DOWN button on the remote control until the red color level is adjusted to 90 ± 5% of the white level. (Refer to Fig. 2-3) 7. Receive the PAL color bar pattern. (Audio Video Input) 8. Press the AV button on the remote control to set to the AV mode. Then perform the above adjustments 2~6.
( PAL) TV
31 H POS OSD 35
A 2-11: CUT OFF
B
Fig. 2-2
1. Set condition is AV MODE without signal. 2. Using the remote control, set the brightness and contrast to normal position. 3. Place the set with Aging Test for more than 15 minutes. 4. Activate the adjustment mode display of Fig. 1-1 and press the channel button (00) on the remote control to select "CUT OFF". 5. Adjust the Screen Volume until a dim raster is obtained. 2-12: WHITE BALANCE NOTE: Adjust after performing CUT OFF adjustment. 1. Place the set with Aging Test for more than 15 minutes. 2. Receive the gray scale pattern from the Pattern Generator. 3. Using the remote control, set the brightness and contrast to normal position. 4. Activate the adjustment mode display of Fig. 1-1 and press the channel button (03) on the remote control to select "R DRIVE". 5. Press the CH. UP/DOWN button on the remote control to select the "R DRIVE", "G DRIVE", "M R CUTOFF" or "M G CUTOFF". 6. Adjust the VOL. UP/DOWN button on the remote control to whiten the R DRIVE, G DRIVE, M R CUT OFF, and M G CUT OFF at each step tone sections equally. 7. Perform the above adjustments 5 and 6 until the white color is looked like a white.
90%
100%
Fig. 2-3
D3-3
|
|
|
> |
|