|
|
|
Categories
|
|
Information
|
|
Featured Product
|
|
|
 |
|
|
There are currently no product reviews.
 ;
I was having a hard time finding the problem with this Mackie 1604 unit. I didn't have a schematic. Went looking on the web and found your site and the price was more then reasonable. Ordered it and within the hour had the manual and within 15 minutes had the unit fixed. Best $4.99 I ever spent. Thank you.
Doug
;
This is a service manual in every sense of the word ( French and German versions of the text are included, as well as English..)
There are explanations of the mechanical and electrical functions, plenty of mechanical drawings, and the needed schematics. The quality of the scanning is excellent - all the component values are clearly legible - and very usefully there are pcb component layouts, so you can find a component on the schematic, and then very quicky pinpoint its physical location on the relevant pcb.
I cannot see how I can give this manual any less than the maximum 5 stars! Great value for money, which will pay for itself immediately. Excellent all round!
;
the manual is great and especially hard to find... thanks for the great service and having a hard to find manuel_
;
Please tell us what you think and share your opinions with others. Be sure to focus your comments on the product. You will receive $2.50 of store credit for Your review.
;
hat alles sehr gut geklappt. Das Servicemaual ist gut zu verwenden. Die Pläne und Schrift
ist klar und leserlich. Außerdem preiswert. Grüße an alle Hifi-Bastler
2. AUDIO CONTROL HEAD TILT ADJUSTMENT
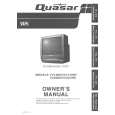
Purpose: To confirm that the tape runs smoothly. In particular, confirm that the tape properly picks up the Audio Signal at the upper part of the head and the Control Signal at the lower part of the head. Symptom of Misadjustment: If the tilt of the Audio Control Head is poorly adjusted, the tape will eventually be damaged. An intermittent Blue screen may be seen in Playback. 1. Play back a T120 cassette tape and check that the tape travels smoothly between the upper and lower guides of the P4 post. 2. If necessary, adjust Black Screw (B) clockwise until the tape begins to curl at the lower edge of the P4 post. Then adjust the screw counterclockwise until the curling is eliminated.
Tape Running Condition Audio Control Head in Tilted Condition Direction to turn for Correction
Black Screw (B) Black Screw (C)
Black Screw (A) Control Head Lower Edge of Tape 0.25mm
Lower Edge of Control Head Fig. M8
4. AUDIO CONTROL HEAD AZIMUTH ADJUSTMENT
Purpose: To adjust the position and height of the Audio Control Head so that it meets the tape tracks properly. Fig. M7 Symptom of Misadjustment: If the position of the Audio Control Head is not properly adjusted, the Audio S/N Ratio is poor. 1. Connect the oscilloscope to the TP4002 on the Main C.B.A. 2. Play back the 6kHz Monaural Audio portion of the alignment tape. 3. Adjust Black Screw (C) on the Audio Control Head base so that the output level is at maximum.
3. AUDIO CONTROL HEAD HEIGHT ADJUSTMENT
The height of the Audio Control Head replacement part is preset at the factory. Purpose: To be sure the tape runs properly along the Control Head. Symptom of Misadjustment: If the control signal is not properly picked up, Servo Operation cannot be achieved. A Blue screen will be seen in Playback. This confirmation is required when the Audio Control Head is replaced.
6KHz-Audio
Maximum
Fig. M9 1. Play back a T120 cassette tape and check that the lower edge of the tape runs approximately 0.25 mm above the lower edge of the Audio Control Head. 2. If necessary, adjust Black Screws (A) and (B) clockwise to lower the tape or counterclockwise to raise. 4. Confirm the height of the Audio Control Head is proper. If not, readjust Black Screws (A) and (B).
2-23
|
|
|
> |
|