|
|
|
Categories
|
|
Information
|
|
Featured Product
|
|
|
 |
|
|
There are currently no product reviews.
 ;
The manual was complete, parts list, adjustment procedures, etc. No worries
 ;
Very usefully, I could find the trouble clearly with that manual.
;
Bon produit. Permet de corriger les couleurs et de redonnez un petit coup de jeune à vos vieilles vidéos. On regrettera juste le manque d'une prise s-vidéo.
;
Quality scan of the actual service manual, just what I was looking for.
;
Straightforward ordering process. Service manual scan was clear & easy to read. Very comprehensive instructions for alignment. Excellent, thank you.
2-4
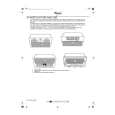
Setting the Clock Press ENTER to start the �AUTO� clock 8
PREPARATION
Reference Information
set feature. Example: To set the clock to 2:30 p.m. on
Initial Settings Using On-screen Display
The MENU screen appears on the TV. broadcasting
The language selection and clock setting must be set when VCR is first plugged in or after it After the VCR is turned off, it automatically August 25 (summer time) 2001. encounters a power failure. updates clock using the data broadcast
1
and press ENTER. signal at 8:00 A.M Setting the Language TIME ZOnE CH
every morning. 2
CLOCK SET
� Press VCR to set remote control operating the VCR. Select �PRESET� using FF or REW, CLOCK SET
2
Preparation Press PROG.. by the local TV stations. � Turn on TV, and select channel (3 4), or video input mode if you made the Audio/Video *The clock is connection (page 11). revised by
SUMMER TIME
SCAnnInG nOW
VCR TV POWER
E n D : PROG ENTER
VCR Press POWER to turn on the VCR.
1 2 Press PROG..
7 8 9
POWER
1 2 3 CH MEMORY
PREPARATION
4 5 6
9
Select the options using FF or REW. The following screen appears on the TV.
PLAY, STOP DST start: Daylight-saving time begins on
A.SELECT
Change the data using PLAY or STOP.
0 100
EnD : PROG ENTER
VC-513
EJECT
1) Set �SUMMER TIME
REW
PLAY
(Daylight-Saving Time)�.
FF
REW F ENTER
Press ENTER to select �CLOCK SET�.
3
CLOCK SET to 3:00 AM (forward one hour). SUMMER TIME DST end: Daylight-saving time ends on
P S n T E R
STOP
SLOW PAUSE/STILL
EnD : PROG ENTER clock automatically changes from 2:00 AM
DISPLAY COUNTER RESET SP/ SLP
REMAIN/ COUNT
first Sunday in April. Because the ENTER
I.SELECT REC TIMER
TV VOL PROG. CANCEL
PROG. Select the language using PLAY or
3
to 1:00 AM (back one hour).
O A R S E T I n G
TIME ZOnE CH the last Sunday in October. The VCR
STOP and press PROG.. clock automatically changes from 2:00 AM MEnU
E n D : PROG ENTER
remember that any part of a scheduled
The screen turns to the MENU screen. Timer Recording that falls between these two times will not be recorded. Select �AUTO� �MANU� using PLAY or AUTO: VCR is using the clock data STOP.
4
EnD : PROG ENTER
Broadcast by the local TV stations. IN: You want to use the DST function, and AUTO: The VCR automatically sets or adjusts the clock. you are leaving in the area that apply
Daylight-saving Press PROG. return to the normal TV screen. If you select �AUTO� mode, proceed to step 8. time.
4
MANU: You can set the clock manually. OUT: You are not leaving in the area that If select �MANU� mode, proceed to next apply Daylight-saving time and you do not step. want to use DST function.
Optional settings on the SET UP screen
2) Set �TIME ZONE�. 5 Vary digits to set the hour.
Other optional settings can be made. Press ENTER while �SET UP� is selected on MENU screen. VCR sets clock using the first STOP : To decrease. The screen turns to the SET UP screen. Coordinated Universal Time information it (To move back, press REW.) option.
If you select �AUTO� for your time zone, PLAY : To increase.
6
finds. If the time is not correct, select Move to the next using FF another time zone or use the �MANU�
TAPE LEnGTH 120 160 180
Page 22 3) Set �CLOCK DATA CH�. Page 28 SAP SET on off Repeat step 5 and 6 to set the minutes, Page 23 COUnTER MEM on off To change language, move down here and set to the desired one. LAnGUAGE EnG FRA ESP month, day, and year (by the last select �AUTO�. The VCR will scan
7
If you don't know the clock data channel, Proceed step 10 to start the clock. the clock data. If AUTO CLOCK SET is unsuccessful, set the To exit, press PROG. once. time and date through the �MANU� clock set menu selection.
two digits). automatically to tune the channel carrying
E n D : PROG
10 Press PROG..
Now the clock starts.
14 15
Toshiba
|
|
|
> |
|