|
Categories
|
Information
|
Featured Product
|
|
|
 |
|
There are currently no product reviews.
 ;
Having purchased a 1994 Kenwood music system from a Charity shop in 2013 (it was a high end product in its day), I found myself not quite knowing where to plug in what, and how to do this, that and the next thing. I needed a Manual, and after failure with another online 'Manual provider' I found Owner Manuals dot com. Well, I wasn't sure, but it was only $5, and if things didn't work out, I wouldn't have lost much...
But things DID work out. After paying my childrens inheritance money, $4.99, I was sent a Manual for my Kenwood System very quickly. Alas, it was in German, and being Scottish, I could not read it or get my system in order from it...a rapid email to them brought the English Manual in short order, and my retro-system was and IS up and running in it's regulation settings.
I am very grateful to http://www.owner-manuals.com for their quick service and for even having such an obsolete Manual in the first place! If you need a Manual for ANYTHING, try here first. I wouldn't be surprised if I bought a 1928 Marconi radio, and got the user Manual for THAT here too!
Top marks.
John Copeland
Glasgow
Scotland
 ;
I was so happy that the owner's manual was available. It is well written and helped me to use the radio/CD player/recorder without problems. Thanks for making it available.
Irene Lambert
 ;
Excellant!!! Very quick and easy....Best $4.99 I have spent in a very long time..
I highly recommend this.
 ;
Thanks so much for the Owner's manual for my Sony PS - FL1. I had purchased the turntable off of eBay. It came in and looked great. Packed well and appeared to be great. I balanced and aligned the tone are and hooked it up. When trying to play a record the tone are would move to the right place and just before it would drop to play it moved back off the edge of the record before touching down. I searched the net for an answer to this issue. No luck. Then I purchased the owners manual and sure enough there was a place to adjust where the stylus touched down. That adjustment solved the problem and saved me a $35 feet to have the player checked out. The manual is well written and easy to understand. It is a must have for anyone with this front loading Sony turntable.
 ;
Some years back I pruchased a Sansui G-9000. I had it cleaned up and a problem with the left channel repaired. When I got it back I hooked it up to my tape decks, turn tables, TV and it played great. The only thing I was not really satisfied with was the performance of my Graphic Equalizer. I purchased this owner's manual had poured myself a cup of coffee. The manual is well organized and written in plain language. It also contained the solution to my dissatisfaction. By using the preamp connections coupled I was able to run everything through my graphic equalizer and now enjoy the full potential of my complete system.
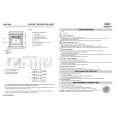
INSTALLATION INSTRUCTIONS
1. ELECTRICAL CONNECTIONS "Warning - this appliance must be earthed" This appliance is normally supplied with a mains lead having a plug fitted in the factory which has been checked for correct earth continuity. If the fitted plug is not suitable for your socket outlet, or if the machine�s mains lead is not fitted with a plug, you should fit a suitable new, good quality plug by following the instructions in (2) below. Any unsuitable plug should be cut off and disposed of in order to avoid a possible shock hazard should it be inserted into a socket. 2. CONNECTION TO A REWIRABLE PLUG to be carried out ONLY by a qualified electrician The wires in the mains lead are coloured in accordance with the following code: BLUE - �NEUTRAL� (�N�) BROWN - �LIVE� (�L�) GREEN AND YELLOW - �EARTH� (�E�) To fit a new plug, proceed as follows: 2.1 Polarized Plugs ( e.g. 3 pin, 13 amp plug conforming to BS 1363A) a. The GREEN AND YELLOW wire must be connected to the terminal in the plug which is marked with the letter �E� or by the Earth symbol or coloured yellow or green and yellow. b. The BLUE wire must be connected to the terminal which is marked with the letter �N� or coloured black. c. The BROWN wire must be connected to the terminal which is marked with the letter �L� or coloured red. 2.2 Non-polarized plugs (e.g. 2 pin with side earth contact) The wire which is coloured GREEN AND YELLOW must be connected to the earth contact. The other two wires should be connected to the two pins, irrespective of colour. 3. FUSE REPLACEMENT If the mains lead of this appliance is fitted with a BS 1363A 13 amp fused plug, replace the fuse only with an A.S.T.A. approved type conforming to BS 1362 and proceed as follows:
1. Remove the fuse cover (A) and the fuse (B). 2. Fit the replacement 13 A fuse into the fuse cover. 3. Refit both into the plug. For all other types of plug, the supply socket should be protected by a 16 A fuse or circuit breaker at the distribution board.
37
|
|
 |
> |
|