|
There are currently no product reviews.
 ;
It was very usefull, it is clear the quality is super, the price I paid is very afordable.
Generally speaking Iam very happy with this company.
;
The manual was exactly what I needed, Good quality scans too. superb.
;
I am so happy found this site as it consists of so many Manuls and easy to aquire. This onei s exactly what I wanted and much more as it has info on not only how to use the tuner but how to repair it as well. I will come here 1st before purchasing else where! Thanks owner-manual.com!
;
Top class product, I printed it out on A3 paper and it is clear and very easy to follow.
Cheaper than buying a new radio!
;
is part of the manual is very useful for repairing
Here are circuit diagrams
if there is damage, I recommend using this part of the
a complete list of circuit boards and components
CAUTIONS WHEN SERVICING
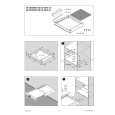
1. Disassembly Procedure 1) Remove the COVER BOTTOM. 2) Remove the screws (pointed by the arrows), and then remove the DECK MECHANISM. See Fig. 1.
Fig-1
3) Remove the COVER TOP. 4) Remove the screws (pointed by the arrows), and then remove the CD MECHANISM. See Fig. 2.
2. Service Position Check the operation in the stable status (using a plate, etc.). See Fig. 3.
Fig-2
Fig-3
3. Test Mode 1. Starting CD Test 1) Use solder to short-circuit the TEST lands. See Fig. 4. 2) Connect the ACC/BACKUP wire of connector assembly to the positive (+) terminal of power supply unit, and the ground wire, to the negative (-) terminal. 3) Adjust the voltage of power supply unit to 14.5 V, and then turn the power on. The test mode will start, and all LCD segments will light. See Fig. 5.
IC401
SOLDER BRIDGE
IC901
Fig-4
2. Releasing CD Test Mode 1) Turn the power supply unit off. 2) Disconnect each wire of connector assembly. 3) Remove the solder from the TEST lands on the Main C.B.
Fig-5
-4-
 $4.99 WDX500 AIWA
Owner's Manual Complete owner's manual in digital format. The manual will be available for download as PDF file aft…
|