|
|
|
Categories
|
|
Information
|
|
Featured Product
|
|
|
 |
|
|
There are currently no product reviews.
 ;
The manual was made available promptly. I is a clean scan of the original. I had no problem downloading it. The scan was well centered and cleanly formatted. It is as good a product as can be had without being the original document.
 ;
Received downlink in less then 8 hours, Item was in good copy condition, and told me how to program the clock timer. The price was very resonable, and the process was very automated and was GREAT to work with.
;
Fast service, document is OK. Thanks! Searched for it long time.
;
I was very pleased with the manual I got for my amateur (ham) radio. Without it I could not figure out how to input and/or change the P/L setting on my radio. It drove me nuts as the radio was essentially useless. That all changed when my manual came. Then it took only minutes and I was done. Now my radio works fine. This is an exceptionally good resource as it's a very easy and user friendly download. Thank you very much! Dziękujemy za!
;
It answered my question, which was how to load the paper. I did notice that the very end of the manual was not visible.
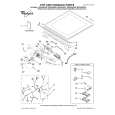
2. Firmly grasp the body of the dryer (not the console panel). Gently lay the dryer on the cardboard. See illustration.
Complete Installation
1. Check that all parts are now installed. If there is an extra part, go back through the steps to see which step was skipped. 2. Check that you have all of your tools. 3. Dispose of/recycle all packaging materials. 4. Check the dryer�s final location. Be sure the vent is not crushed or kinked. 5. Check that the dryer is level. See �Level Dryer.� 6. For power supply cord installation, plug into an outlet. For direct wire installation, reconnect power. 7. Remove the blue protective film on the console and any tape remaining on the dryer. 8. Read �Dryer Use.� 9. Wipe the dryer drum interior thoroughly with a damp cloth to remove any dust. 10. Select a Timed Dry heated cycle, and start the dryer. Do not select the Air Only Temperature setting. If the dryer will not start, check the following:
â� â� â� â�
3. Examine the leveling legs. Find the diamond marking.
4. Screw the legs into the leg holes by hand. Use a wrench to finish turning the legs until the diamond marking is no longer visible. 5. Place a carton corner post from dryer packaging under each of the 2 dryer back corners. Stand the dryer up. Slide the dryer on the corner posts until it is close to its final location. Leave enough room to connect the exhaust vent.
Controls are set in a running or �On� position. Start button has been pushed firmly. Dryer is plugged into an outlet and/or electrical supply is connected. Household fuse is intact and tight, or circuit breaker has not tripped. Dryer door is closed.
Connect Vent
1. Using a 4" (10.2 cm) clamp, connect vent to exhaust outlet in dryer. If connecting to existing vent, make sure the vent is clean. The dryer vent must fit over the dryer exhaust outlet and inside the exhaust hood. Check that the vent is secured to exhaust hood with a 4" (10.2 cm) clamp. 2. Move dryer into its final location. Do not crush or kink vent. 3. (On gas models) Check that there are no kinks in the flexible gas line. 4. Once the exhaust vent connection is made, remove the corner posts and cardboard.
â�
11. When the dryer has been running for 5 minutes, open the dryer door and feel for heat. If you feel heat, cancel cycle and close the door. If you do not feel heat, turn off the dryer and check the following:
â�
There may be 2 household fuses or circuit breakers for the dryer. Check that both fuses are intact and tight, or that both circuit breakers have not tripped. If there is still no heat, contact a qualified technician.
Level Dryer
Check the levelness of the dryer. Check levelness first side to side, then front to back.
NOTE: You may notice a burning odor when the dryer is first heated. This odor is common when the heating element is first used. The odor will go away.
If the dryer is not level, prop up the dryer using a wood block. Use a wrench to adjust the legs up or down and check again for levelness.
16
|
|
|
> |
|