|
|
|
Categories
|
|
Information
|
|
Featured Product
|
|
|
 |
|
|
There are currently no product reviews.
 ;
I have never bought a service manual which is as competely readable as this althogh it was a scanned pdf. Thank you for this succesful manual also cheaper than other sites.
;
Thanks for a very good and readable servicemanual. Just what I needed as a "dinosaur technician". I really recommmend this site and will come back.
Åsbjörn
;
The manual I purchased was just what I needed. I was glad to find a site where I can find so many manuals on a wide variety of products.
;
The best diagram that I used in a long time. Everything was right on te money. It was easy and fast. Iwoiuld but again when I need a service manual.
;
The manual is great help for me, i'm happy to have it,thanks
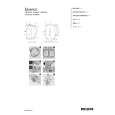
MODEL: WL-82913 DM Module Replacement
1. Unplug the Card Reader USB and 1394 cables from the DM module, and refer to the Chassis Removal Procedure to slide the chassis towards the rear of the set. 2. Remove screws (a), to remove the DM Rear Panel, Figure 1. 3. Remove screws (a) and (b) to remove the DM Module Cover, Figure 2. 3. Remove the E2P module from the original DM and plug it into the replacement DM. 5. Plug the DM module securely into the PCB-DTV-TUNER. 6. Check operation before installing the DM Cover, Figure 3. � Insert insulation (cardboard) between the Demodulator Ground Spring and the DM. � Plug the set in and check the operation. � If O.K., uplug the set and install the DM Cover.
Figure 1: DM Rear Panel
Figure 2: DM Module Cover
Figure 3: Checking new DM Operation
Page 21
|
|
|
> |
|