|
|
|
Categories
|
|
Information
|
|
Featured Product
|
|
|
 |
|
|
There are currently no product reviews.
 ;
I found this manual to be complete in every detail. Besides the schematic it has a complete set of alignment instructions which are easy to understand. It also includes a complete parts list as well as an explanation of how the power supply and safety shutdown circuits operate. Even a schematic of the tuner is included.
 ;
The product was good and just what I needed, however I had moderate difficulty with the down load because the sight would not recognize my pass word. I was finally given a direct link to the manual and that worked.
;
Very quick and easy website to use and fast download of manual, quality of manual is excellent and will be pleased to use this service again in the future, thanks so much!
;
It is an very good and clear scanned service manual.
very recommended.
;
Easy to order the manual. Good quality and fast delivery.
MODELS: VS-A50 / WS-A48 / WS-A55 / WS-A65
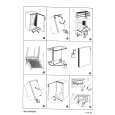
SERVICING THE DIAMONDSHIELD� 1. DiamondShield� Removal Procedure
The location of the DiamondShieldTM molding clips may vary between models, top and bottom, or sides. Use the appropriate disassembly procedure given below. Note: Wear gloves when handling the DiamondShield� to prevent finger prints.
Top & Bottom Molding Clips
Side Molding Clips
1. Gently insert a small screwdriver between the DiamondShield� and one end of the clip to pry the clip loose.
1. Gently insert a small screwdriver between the DiamondShield� and one end of the clip to pry the clip loose.
2. Remove both clips by pulling them toward you.
2. Remove both clips by pulling them toward you.
3. Carefully insert a small screwdriver into the gap at the top/center point of the Shield and pull the Shield slightly away from the unit. Place your hands at the points shown and gently bow the Shield toward you and remove from the unit. Then re-install the two clips.
3. Carefully insert a small screwdriver into the gap at the side/center point of the Shield and pull the Shield slightly away from the unit. Place your hands at the points shown and gently bow the Shield toward you and remove from the unit. Then re-install the two clips.
2. DiamondShield� Installation Procedure
*(See the Parts List for DiamondShield� part numbers) To install the DiamondShieldTM, reverse the above Removal Procedure.
Page 15
|
|
|
> |
|