|
|
|
Categories
|
|
Information
|
|
Featured Product
|
|
|
 |
|
|
There are currently no product reviews.
 ;
Perfect source for service manuals: fast and professional transaction; high quality, perfect readable and largely scaleable PDF; complete schemes, diagrams and spare part list. Tnx a lot, cu again!!!!
;
I got your link from a friend and I must say that I am really satisfied with your service. Specially this B&O manual I didn't find anywhere on the web... but you could deliver it :-) . You deliver very fast and the copy is of good quality. So your webpage is bookmarked. Thanks
;
This was the Sony CCU-500A Service manual I was looking for.
The price was reasonable.
The permission to download was quck.
I will use Owner-Manual.com for all my manual needs.
;
Excellent printing quality.
A complete and very usefull service manual with all details.
GREAT SERVICE AT VERY LOW PRICE!
A+++++++++++++++++++++++++
;
Excellent printing quality.
A complete and very usefull service manual with all details.
GREAT SERVICE AT VERY LOW PRICE!
A+++++++++++++++++++++++++
6. Video Out Gain Adjustment
Test Point: Video Output Connector 8 Aim the Camera at the Logarithmic Gray Scale Chart.
8 Connect the terminated Oscilloscope with 75� to the
Video Output Connector.
8 Adjust data with the ARROW keys so that the Video
300 mV ± 10 mV
Output signal level becomes 700 mV ± 50 mV as shown in Fig. 5-6.
Fig. 5-7
8 Press the ENTER key.
700 mV ± 50 mV
8 Adjust data with the ARROW keys so that the Video
Output Signal level becomes 300 mV ± 10 mV as shown in Fig. 5-7. 8 Press the ENTER key for the next adjustment. Fig. 5-6
8 Press the ENTER key for the next adjustment. 8 Adjust data with the ARROW keys so that the Video
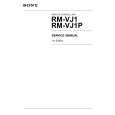
11.2. Burst Phase Adjustment
Test Point: Video Output Connector 8 Aim the Camera at the Logarithmic Gray Scale Chart.
8 Set the Mode Switch of the Vectorscope to �NTSC� mode. 8 Adjust data with the ARROW keys so that the Burst Phase
Output signal level becomes 700 mV ± 50 mV as shown in Fig. 5-6.
8 Press the ENTER key for the next adjustment.
becomes 135° ± 1° as shown in Fig. 5-8.
NTSC mode
cy
PAL mode
cy R V
7. Manual Iris Adjustment A
8 After confirming the Iris close, press the ENTER key for
dø
20% dG
g
MG
g
R V
MG
YL
75% 100%
135 ± 1 °
b U
dø 10° 0° 10°
20% dG
YL
75% 100% b U
the next adjustment.
10° 0° 10°
90 ± 2 °
20% dG yl B
20% dG
yl
B
8. Manual Iris Adjustment B
8 After confirming the Iris open, press the ENTER key for
G
r
CY
mg
G
r
CY
mg
the next adjustment.
Fig. 5-8
9. Manual Iris Adjustment C
8 After confirming the Iris close, press the ENTER key for 8 Set the Mode Switch of the Vectorscope to �PAL� mode. 8 Adjust data with the ARROW keys so that the Burst Phase
the next adjustment.
10. Manual Iris Adjustment D
8 After confirming the Iris open, press the ENTER key for
becomes 90° ± 2° as shown in Fig. 5-8. 8 Press the ENTER key.
8
Set the Mode Switch of the Vectorscope to �NTSC� mode.
the next adjustment.
8 Adjust data with the ARROW keys so that the Burst Phase
11.1. Burst Level Adjustment
Test Point: Video Output Connector 8 Aim the Camera at the Logarithmic Gray Scale Chart.
8 Connect the terminated Oscilloscope with 75� to the
becomes 135° ± 1° as shown in Fig. 5-8. 8 Set the Mode Switch of the Vectorscope to �PAL� mode.
8 Adjust data with the ARROW keys so that the Burst Phase
becomes 90° ± 2° as shown in Fig. 5-8.
8 Repeat adjustment from 11.1 to 11.2 until both Burst Level
Video Output Connector. 8 Adjust data with the ARROW keys so that the Video Output Signal level becomes 300 mV ± 10 mV as shown in Fig. 5-7.
and Phase are adjusted to proper position as show in Fig. 5-7 and Fig. 5-8.
8 Press the ENTER key for the next adjustment.
� 11 �
|
|
|
> |
|