|
|
|
Categories
|
|
Information
|
|
Featured Product
|
|
|
 |
|
|
There are currently no product reviews.
 ;
Good quality instructions manual. Very useful to me. Quick and excellent service from Owner-Manuals... Thanks !!!
;
Sono molto soddisfatto e, quando mi necessiterà, mi avvarrò nuovamente di questo servizio!
;
A comprehensive Operating and Service Manual. All schematics are complete and easy to read. The PCB drawings and complete parts list are very helpful. I would definitely recommend this manual.
;
SCANNING OF HIGH QUALITY
VERY, VERY HIGH VELOCITY DOWNLOAD
VERY GOOD PRICE,
TRUE SATISFIED, THANKS
;
Genuine Toshiba owner's manual. Couldn't really ask for more. And written in understandable English in contrast to a few recent experiences I have had with manuals for other equipment other than Toshiba but made in China and written in "Chinglish"!
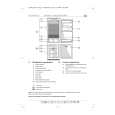
VIEWING PICTURES
â� Image Quality Selection
1. Click the Setup Menu button in the main page. The Network Setup window opens.
â� Still Picture Storage to the PC
The camera picture can be saved as a still image in your PC. 1. Move the cursor to the picture area in the screen, and right-click to select �Save As�. 2. Enter a file name that is given to the picture, and specify the storage place in the dialog box.
2. Click the Image button in the menu bar lined on top of the screen. The Image Setup window appears.
3. Click Save.
3. Select the parameters. Refresh Interval: Fast, Middle, Slow, Very Slow Image Capture Size (pixels): 640x480, 640x240*, 320x240, 160x120 Quality of Image: Super Fine, Fine, Normal, Rough Bandwidth Control (kbps): 32, 64, 128, 256, 512, 1 024, Unlimited *: The 640 x 240 selection is good to display moving images without aliasing, while 640 x 480 selection is good to display motionless images. 4. Click the SET & REBOOT button. It will take about 5 seconds to set the new parameters and reboot the camera. 5. Click the Return button to go back to the main page. -37-
|
|
|
> |
|