|
|
|
Categories
|
|
Information
|
|
Featured Product
|
|
|
 |
|
|
There are currently no product reviews.
 ;
Scan quality is very good. Price is very reasonable. If you're looking to purchase a copy of this manual, this is the one to get.
 ;
Perfect for my use.Could have better pictures,but otherwise perfect ;)
;
This is one of four manuals I have downloaded recently.
Purchase was very straight forward and the authorising email arrived in about 4 hours.
The quality of the scan is good. Print is clear and square to the page edges.
;
Exactly as advertized. High quality digital copy of the Nak 610 user manual. Easy download and access. Highly recommended.
;
The manual was exactly what I wanted and I found it nowhere else. Thanks!
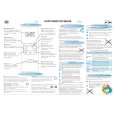
5. Mount the safety wire angle (accessory) on the 2nd anchor bolt and connect the safety wire (accessory) to the angle. q Disconnect the safety wire from the Anchor bolt Upper side safety wire angle. Mark w w Engage the face marked q with the anchor bolt. w Insert e Bend e Bend the face marked w. q Disconnect r Connect the safety wire to the safety wire angle again.
Safety wire Mark q Lower side Safety wire angle r Connect
Note: To use the anchor bolt that was already installed, the use of 2 spacer nuts is helpful.
Spacer nuts Spacer nuts
Safety wire Safety wire angle Existing anchor bolt
6. Connect the mounting base to the tip of the safety wire.
Roof space
Safety wire (Accessory)
Insert the mounting base into the hole
Mounting base
7
|
|
|
> |
|