|
There are currently no product reviews.
 ;
The quality is quite good and clear. Nothing of the informations inside is lost during the digitalizing process
 ;
Very good service, fast downloads and good manuals.
;
Good qulity. Even as it is an old manual (from 1991-1992) it has a good scanned quality and is complete, including user's manual, disassembly intructions, diagrams and schematics, ajustments, troubleshooting and parts list, as usual with SONY manuals and Owner-manuals service.
;
tres bon document
cela a permis de verifier la connection de l'ecran
merci
salutations
;
The manual was of good quality with high resolution schematic diagrams.
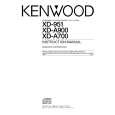
RXD-951/A700/A900/V616/V818/V919
DISASSEMBLY FOR REPAIR
1. How to remove the front panel.
(1) Turn the power ON and then push the open/close key to open the tray. (2) After removed the tray cover, push the open/close key to close the tray and then turn the power OFF. (3) Remove the push rivet (1) and 4 screws (2, 3). (4) The front panel can be separated by removing the 3 screws (4) located at the bottom plate of the front panel.
6 x2 6 7 6 3 3 3 2 1
2. How to remove the CD mechanism
(1) Remove 4 screws (5) on the left side/right side of chassis. (2) Remove 4 screws (6) and the cap (7) on the rear panel. (3) Disengage the CD mechanism as FIG.2. (4) Connect the GND plate of X32 PCB and the chassis with a alligator clip wire (8).
5 x4 4 x3
Fig.1
3. How to remove the mult control knob.
� Remove the knob by string (9).
4. How to open the tray if not comes out.
(1) From the rear side of the CD mechanism, use a screw driver or the like to turn the friction arm fully counterclockwise. (2) Pull out the tray front wards by hand when the tray comes just out. * As for details of items in the below, refer to RXD-F3 service manual (B51-5091-00). (1) How to detach the tray. (2) How to attach the tray. (3) Replacing the pickup.
8
REAR SIDE Friction Arm
9
Fig.2
4
|