|
|
|
Categories
|
|
Information
|
|
Featured Product
|
|
|
 |
|
|
There are currently no product reviews.
 ;
I am very happy with the owner's manual. I bought a used Casio and was so relieved that I was able to get a hold of a owner's manual. It was very easy to download the manual and I had no problems with printing it. Thank you! Nancy Whalen
;
The purchased manual is an high-quality scan of the original JVC paper-based Owner´s Manual. I am very satisfied!
;
Very satisfied with received document, all is right, Thank You very much, it was a Pleasure to work with You.
 ;
great site, the most easy and fastest way to find the manual you need, no 5 star because the manual was only available in german, but I speak german as well so no problem for me.
;
thanks for this download i got a pioneer bdp-lx70a blu-ray player and it had no manual i search everywhere on the internet and came across owner-manuals.com and i found that it was so easy to find and downloaded from this site if i ever need a manual again this would be the first place that i would come too thanks guys
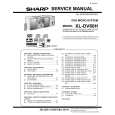
Einstellen der Uhr
3
Innerhalb von 30 Sekunden die Taste PRESET ( oder ) drücken, um die Stunde einzustellen; danach die MEMORY/SET-Taste betätigen.
XL-DV60H
DEUTSCH
1 2
Die Taste PRESET ( oder ) einmal drücken, um die Uhrzeit um eine Stunde vorzustellen. Sie gedrückt halten, um die Uhrzeit fortlaufend vorzustellen.
3
4
Innerhalb von 30 Sekunden die Taste PRESET ( oder ) drücken, um die Minuten einzustellen; danach die MEMORY/SET-Taste betätigen.
4
Die Taste PRESET ( oder ) einmal drücken, um die Uhrzeit um 1 Minute vorzustellen. Die Taste gedrückt halten, um die Uhrzeit fortlaufend vorzustellen. �berprüfen der Zeitanzeige: Die CLOCK-Taste drücken. Die Zeitanzeige erscheint ca. 8 Sekunden lang. Hinweis: "CLOCK" oder Uhrzeit blinkt per Druck auf die CLOCK-Taste, wenn nach einem Stromausfall oder nach dem Herausziehen des Netzsteckers die Stromversorgung wiederhergestellt wird. Die Uhr wie folgt neu einstellen. Nachstellen der Uhr: Die Schritte im Abschnitt "Einstellen der Uhr" ab Schritt 1 durchführen. Wenn "CLOCK" im Schritt 1 nicht blinkt, wird der Schritt 2 (zum Anwählen der 24-Stunden- oder 12-Stunden-Anzeige) übersprungen. Verändern der 24-Stunden- oder 12-Stunden-Anzeige: 1 All die programmierten Inhalte löschen. [Siehe Abschnitt "Löschen all des Speichers (Rücksetzen)" auf Seite 56 für weitere 2 Einzelheiten.] Die Schritte im Abschnitt "Einstellen der Uhr" ab Schritt 1 durchführen.
In diesem Beispiel ist die Uhr für die 24-Stunden-Anzeige (0:00) eingestellt.
5
Vorbereitung für die Inbetriebnahme
1
Die CLOCK-Taste drücken, und innerhalb von 8 Sekunden die MEMORY/SET-Taste betätigen.
6
2
Innerhalb von 30 Sekunden die Taste PRESET (
oder
)
drücken, um die 24-Stunden- oder 12-Stunden-Anzeige anzuwählen; danach die MEMORY/SET-Taste betätigen.
7 8
"0:00" "AM 12:00"
Die 24-Stunden-Anzeige erscheint. (0:00 - 23:59) Die 12-Stunden-Anzeige erscheint. (AM 12:00 - PM 11:59)
D-18
05/3/4
XL-DV60H(H)_D.fm
TINSZA042SJZZ
|
|
|
> |
|