|
There are currently no product reviews.
 ;
Well done scan of a useful manual. It will be useful in my workbench!!
 ;
Excelent scan job. It's a fully detailed service manual of this model.
;
Do a quick order, scan quality is high.
I recommend to all!
;
This manual is perfect! Just what I needed. Thanks!
;
This manual was very clear and complete, the prices can't be beat, great to have older manuals available!
XM-4060GTX SECTION 3 ELECTRICAL ADJUSTMENT
Bias Adjustment
Note : The Bias adjustment should be performed only if any of Q109 and Q110 for RV104, Q209 and Q210 for RV204, Q309 and Q310 for RV304, and Q409 and Q410 for RV404 are replaced. Setting :
stabilized power supply digital voltmeter
B+, REM terminals
set
+ _
GND terminal
test points
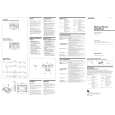
Procedure: 1. Rotate variable resistors RV104 (FRONT L-CH), RV204 (FRONT R-CH), RV304 (REAR L-CH) and RV404 (REAR R-CH) full clockwise as seen from the pattern side to minimize the bias current. 2. The input signal is with no signal. 3. Connect the stabilized power supply between B+ and REM terminals and gradually increase the voltage to 14.4 V while checking for any abnormal current. 4. Adjust RV104 (FRONT L-CH), RV204 (FRONT R-CH), RV304 (REAR L-CH) and RV404 (REAR R-CH) so that the digital voltmeter connected between the respective test points reads 6±1 mV. RV Ref. No. RV104 RV204 RV304 RV404 Test points TP11 and TP12 TP21 and TP22 TP31 and TP32 TP41 and TP42
5. After this adjustment, verify that the current value of the stabilized power supply is 1.4 to 1.8 A. Adjustment Location :
� MAIN BOARD (CONDUCTOR SIDE) � RV304 BIAS ADJUSTMENT (REAR L-CH) TP41 TP31TP32 TP42 TP12 RV404 BIAS ADJUSTMENT (REAR R-CH) TP11 RV104 BIAS ADJUSTMENT (FRONT L-CH) TP21 RV204 BIAS ADJUSTMENT (FRONT R-CH) TP22
9
|