|
|
|
Categories
|
|
Information
|
|
Featured Product
|
|
|
 |
|
|
There are currently no product reviews.
 ;
Original well scanned manual. Got the job done. Microwave problem found & corrected. For $5 and a new magnitron from ebay, it was a cheap and good the first shot fix. Electrical schematics allowed me to mage sure every thing else was ok before cutting and order for parts. Hard to live without.
;
I was very skeptical of this website, I have never downloaded manuals before. I put it on the AMEX and payed through Paypal to ensure protection. I got the manual exactly as described and now I can replace the filter capacitor for this amp. Great Price, others selling for 12.99 or more and this is the same manual. I will search out this website for other manuals. Thank you
;
Manual was reasonably easy to follow. I am not an engineer or know much about electronics but with the manuals help I was able to figure out the problem, identify the part required for the repair. Replacement part cost around $30. Whilst replacing the part I was telling myself, "this aint gonna work cos it seems far too easy". Took about 15 minutes to do and my plasma TV works a treat. Would never have been able to do this without the service manual.
;
It is OK, this manual help me to repair my dynacord
 ;
Good manual. Even it is an old printed manual, it is well scanned and complete, with all drawings, schematics and parts list. Very good return for the cost.
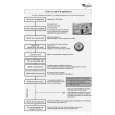
ADJUSTMENT
< TUNER SECTION >
1. Clock Adjustment Settings : � Test point : Method : TP2 (CLK) � Adjustment location : L901 Set to AM 531 kHz and adjust L901 so that the test point becomes 1.0 MHz ± 1 kHz. 2. AM VT Check Settings : � Test point : TP1 (VT) Method : Set to AM 531 kHz and check that the test point is 1.0 V ± 0.5 V. Then set to AM 1602 kHz and check that the test point is 6.5 V ± 1.0 V. 3. AM Tracking Adjustment Settings : � Test point : TP8 (Lch), TP9 (Rch) � Adjustment location : ANT801 ....................................... 603 kHz TC801 ........................................ 1404 kHz *Repeat this adjustment a few times until the wave shape has the maximum amplitude. 4. AM IF Adjustment Settings : � Test point : TP8 (Lch), TP9 (Rch) � Adjustment location : L806 ............................................ 450 kHz 5. FM VT Adjustment. Settings : � Test point : TP1 (VT) � Adjustment location : L805 Method : Set to FM 108.0 MHz and adjust L805 so that the test point bcomes 6.8 V ± 0.2 V. Then set to FM 87.5 MHz and check that the test point is 1.5 V ±1.0 V. 7. FM Tracking Check Settings : � Test point : PHONES-OUT (volume max) Method : Set to 87.5 MHz, 108.0 MHz and check that the test point is 10 dB ± 6 dB. 8. FM Separation Check Settings : � Test point : PHONES-OUT (volume max) � Input level : 60 dB, 1 kHz Method : Set to FM 98.0 MHz and check that the separation is more than 17 dB. 9. Mono Distortion Check Settings : � Test point : PHONES-OUT (volume max) � Input level : 60 dB, 1 kHz Method : Set to FM 98.0 MHz and check that the mono distortion is less than 3.0 %. 10. Output level check <AM> Settings: �Test point : TP8 (Lch), TP9 (Rch) � Input level : 74 dB Method : Set to AM 1000 kHz and check that the test point is 100 mV ± 15 mV . <FM> Settings: �Test point : TP8 (Lch), TP9 (Rch) � Input level : 60 dB Method : Set to FM 98.0 MHz and check that the test point is 270 mV ± 15 mV.
6. FM Tracking Adjustment Settings : � Test point : TP3 (FM IF) � Adjustment location : L804 Method : Set to FM 108.0 MHz and adjust L804 so that the test point is maximum and distortion is minimum.
� 23 �
|
|
|
> |
|