|
|
|
Categories
|
|
Information
|
|
Featured Product
|
|
|
 |
|
|
There are currently no product reviews.
 ;
Great manual, great price. Has a few of the basic operating instructions that most service manuals leave out. Complete instructions for disassembling board by board, safety precautions, schematics, complete parts list.
;
I am very pleased with the service manual for my RT-909. This was an easy purchase and great procuct, and much cheaper than other venues i had looked at. This web site is now listed in my favorites list. KEEP UP THE GOOD WORK. THANKS. J. BROWN
;
A very well written and easy to understand manual.
;
There was no problem at all.After paying i had to wait only a few hours,than i could
download the manual in best pdf-quality.
Thank You !
 ;
I found this service manual to be complete in every detail except for troubleshooting charts. It would be helpful if it had a set of troubleshooting charts; however it is a very good manual otherwise and for the price it is very well worth it.
XR-CA310/L210 SECTION 1 GENERAL
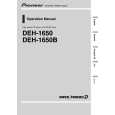
Location of controls
This section is extracted from instruction manual.
Setting the clock
The clock uses a 24-hour digital indication. Example: To set the clock to 10:08
1
DIR
SRC SOURCE MBP
D-BASS
Press (DSPL) for two seconds.
The hour indication flashes.
SEEK AMS
MODE
D
SEL
BTM
DISC REP SHUF ATA
OFF
1 Press either side of the volume button to set the hour.
to go forward
ATT
RELEASE
SENS
AF
1
2
3
4
5
6
TA
PTY
DSPL
XR-CA310
to go back
Refer to the pages listed for details. 2 Press (SEL). 1 Volume +/� button 7 2 MODE button During radio reception: BAND select 8, 9 During CD/MD playback*: CD/MD unit select 17 3 XR-CA310 SOURCE (TUNER/CD/MD) button 8, 9, 17 XR-L210 TUNER button 8, 9 4 SEL (select) button 7, 14, 15, 16, 17 5 Z (eject) button 7, 8, 9, 17 6 Display window 7 m/M (fast winding)/DIR (tape transport direction change) buttons 7, 8 8 MBP (My Best sound Position) button 16 9 D-BASS button 16 q; SEEK/AMS +/� button 9, 11, 14, 18 Seek 9 Automatic Music Sensor* 18 Manual search* 18 qa RELEASE (front panel release) button 6, 19 qs ATT (attenuate) button 15 qd SENS/BTM button 8, 9, 13 qf RESET button (located on the front side of the unit behind the front panel) 6 qg AF button 10, 11, 13 qh Number buttons 8, 9, 14, 15, 18 During radio reception: Preset number select 9, 11 During tape playback: (6) ATA 8 During CD/MD playback*: (1) DISC � 18 (2) DISC + 18 (3) REP 18 (4) SHUF 18 qj TA button 12, 13 qk PTY (programme type) button 14 ql DSPL (display mode change) button 7, 10, 17 w; OFF button** 6
The clock starts. The minute indication flashes.
3 Press either side of the volume button to set the minute.
to go forward to go back
2
Press (DSPL).
After the clock setting is complete, the display returns to normal playback mode.
* XR-CA310 only ** Warning when installing in a car
without ACC (accessory) position on the ignition key switch Be sure to press (OFF) on the unit for two seconds to turn off the clock display after turning off the engine. When you press (OFF) momentarily, the clock display does not turn off and this causes battery wear.
5
3
|
|
|
> |
|