|
|
|
Categories
|
|
Information
|
|
Featured Product
|
|
|
 |
|
|
There are currently no product reviews.
 ;
Perfect. Very good service and very good scanning quality. All sheets are very legible. Thank's
;
My first manual from Owner-Manuals.com but not the last! I am very satisfied with the easy ordering and promt delivery of a manual I did not find anywhere else.
 ;
This manual is very helpfull to use the Power Supply. All technical information has been available.
For service use the circuit diagrams are very good.
Thanks .
;
Very comprehensive document which is a must-have for any Satellit 2100 owner whose set up is somewhat intricate. Due to the bad quality of the pictures that are rather dark and a bit blurred I gave 4-star feedback.
;
The manual was missing 2 pages but when I presented the problem to the company they made every attempt to get the 2 pages to me, when they couldn't they refunded my money. A very pleasing and easy transaction. The manual they provided was the original, it was concise and to the point. I plan to do business with this company again when should the need arise.
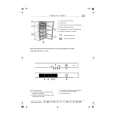
Mounting / Montage / Montaje / ###
Parts List / Liste des pièces / Lista de las piezas / ###
1 2 3 4 5 6
2.5 m (98 1/2 in./po.) �2
M4 � 40 �8 �8 �2 �2
Mounting example / Exemple de montage / Ejemplo de montaje / ###
1
Mark the four bolt holes. Make them 3.3 mm* (5/32 in.) in diameter. Marquer les quatre orifices des boulons. Percer des trous de 3,3 mm* (5/32 po.) de diamètre. Marque los orificios para los cuatro pernos. Taládrelos con 3,3 mm* de diámetro. ### * = 5 mm (7/32 in./po.)
2
Remove the grille net. Retirez le filet de la grille. Extraiga la red de la rejilla. ###
6 1
m
3
* White cord � Left speaker Gray cord � Right speaker * Cordon blanc � Haut-parleur gauche Cordon gris � Haut-parleur droit * Cable blanco � Altavoz izquierdo Cable gris � Altavoz derecho * ### � ### ### � ### Black-striped cord Cordon rayé noir Cable con raya negra ###
ø 103 mm (4 1/8 in./po.)
5
ø 3.3 mm* (5/32 in./po.)
4
3
Speaker Haut-parleur Altavoz ####
4 2*
Power amplifier, etc. Amplificateur de puissance, etc. Amplificador de potencia, etc. ##
5
Door panel Panneau de porte Panel de la puerta ###
5
Press and insert the edges of the grille net. Pousser et insérer les bords du filet de la grille. Presione e inserte los extremos de la red de la rejilla. ###
How to remove the grille net Comment retirer le filet de la grille Cómo extraer la red de la rejilla ###
6
5
Flat mounting (installed flush with the surface of the dash) Montage plat (ne ressortant pas de la surface du tableau de bord) Montaje plano (instalación a ras con la superficie del tablero de instrumentos) ##########
This speaker can be made to fit almost any type of car by removing the mounting tabs. Use clippers or pliers, etc. to cut or snap the mounting tabs off so that it is even with the edge of the speaker frame as illustrated.
Notes After removing the mounting tabs, handle the speaker frame with care, as the edges may be sharp.
Este altavoz puede adaptarse a casi cualquier tipo de automóvil mediante la extracción de las lengüetas de montaje. Utilice cortadores o alicates, etc., para cortar las lengüetas de montaje de forma que haya uniformidad con el borde del marco del altavoz tal como se ilustra.
Notas Después de extraer las lengüetas de montaje, maneje el marco del altavoz con cuidado, ya que los bordes pueden estar afilados.
Ce haut-parleur peut être adapté à presque tous les types de voitures en supprimant les pattes de montage. Utilisez des pinces, etc., pour couper ou enlever les pattes de montage de façon à ce qu�il n�y ait plus de saillies sur le bord du hautparleur comme illustré.
Remarques Lorsque vous avez enlevé les pattes de montage, manipulez le haut-parleur avec précaution car le bord peut être coupant.
################# #########
########################## ################
|
|
|
> |
|