|
|
|
Categories
|
|
Information
|
|
Featured Product
|
|
|
 |
|
|
There are currently no product reviews.
 ;
Great scan but please note that it is entirely in GERMAN.
 ;
High quality scan of the manual, very quick and easy download and very important, a truly honest price. thanks
;
Minden rendben, de két megjegyzés, az ábrák nehezen kivehetők és a fizetés után 24 órát kell várni a letöltésre.
;
Manual correct, and complete. Downloads cleanly. Format of manual was presumably difficult to PDF to A4, but works reasonably well.
;
This was a hard to find manual. When I did find it , some sites wanted way too much for the file.
Owner-manual .com had it for a really reasonable price. Not only that but it was sent very quickly and was a quality scanned document, unlike some others I purchased from a different site.
Good job guys!!
Larry
Getting started
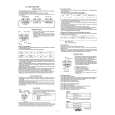
To connect to an audio amplifier or receiver
You can enjoy high-quality audio by connecting the unit's audio output to your amplifier or receiver. The unit
VIDEO OUT VIDEO S-VIDEO
NTSC PAL
AV COMPU LINK
AUDIO OUT
LEFT
PCM/STREAM
OPTICAL
RIGHT
DIGITAL OUT
Amplifier or receiver White Red White
IN
LEFT
AUDIO
RIGHT
Red
Getting started
Audio cable (not supplied) � Connect the unit's AUDIO OUT to any line-level inputs (such as AUX, DVD, CD, etc.) of an audio amplifier or receiver.
To connect to audio equipment with a digital input
You can enhance the sound quality by connecting the unit�s DIGITAL OUT (optical) to the digital input of an amplifier, DAT or MD by using an optional digital cable. The digital stereo audio signal from a disc is directly transferred. If you connect the unit to a Dolby Digital, DTS or MPEG multichannel decoder or an amplifier with a built-in decoder by using an optional digital cable, you can enjoy high-quality surround sound. When you make the digital connection, also make the analog connection, because, depending on the disc type, no audio may be reproduced from the DIGITAL OUT. The unit
VIDEO OUT VIDEO S-VIDEO
NTSC PAL
AV COMPU LINK
AUDIO OUT
LEFT
PCM/STREAM
OPTICAL
RIGHT
DIGITAL OUT
Optical digital cable (not supplied) Digital equipment
White
Red Audio cable (not supplied)
White
IN
LEFT RIGHT
IN DIGITAL
AUDIO
OPTICAL
Red
� For digital connection, connect the unit�s DIGITAL OUT (optical) to the digital input of an audio equipment using an optional digital cable.
NOTES
� When you connect the unit's DIGITAL OUT to digital audio equipment, before using, make the �DIGITAL AUDIO OUTPUT� setting in the �PREFERENCE 2� on-screen display correctly according to the connected audio equipment. If the �DIGITAL AUDIO OUTPUT� is not set correctly, loud noise may be generated from speakers, causing damage to your speakers. See �DIGITAL AUDIO OUTPUT� on page 35. � With the digital connection, the unit�s settings for COMPRESSION and DOWN MIX are invalid. Settings for these items must be made from the decoder.
13
|
|
|
> |
|