|
|
|
Categories
|
|
Information
|
|
Featured Product
|
|
|
 |
|
|
There are currently no product reviews.
 ;
This is an excellent handbook. We had no information on the appliance until we obtained this and are now able to use the appliance to its full potential. Strongly recommended.
;
Very happy to find this from owners-manual.com and the enclosed spec sheet as well.
Not longer available from Sony.
;
The Owner's manual was very helpful. The WEGA is about 35 years old and needed repair.
Your Website is pretty good und easily to handle.
Thank You
Carl-W. Lohmann
;
Perfect. Very good service and very good scanning quality. All sheets are very legible. Thank's
;
My first manual from Owner-Manuals.com but not the last! I am very satisfied with the easy ordering and promt delivery of a manual I did not find anywhere else.
Getting started
To connect to audio equipment with a digital input
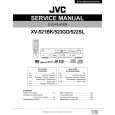
You can enhance the sound quality by connecting the unit�s DIGITAL OUT to the digital input of an amplifier, DAT or MD by using an optional digital cable (the XV-521BK/523GD/525BK provides both the optical and coaxial jacks while the XV-421BK only provides the coaxial jack). The digital audio signal from a disc is directly transferred. If you connect the unit to a Dolby Digital or DTS decoder or an amplifier with a built-in decoder by using an optional digital cable, you can enjoy high-quality surround sound. When you make the digital connection, also make the analog connection, because, depending on the disc type, no audio may be reproduced from the DIGITAL OUT. For XV-521BK/523GD/525BK When using the DIGITAL OUT (OPTICAL) jack, remove the protection cap. Do not lose the removed cap. When the DIGITAL OUT (OPTICAL) jack is not used, fix the protection cap into the jack.
Optical digital cable (not supplied) Coaxial digital cable (not supplied) : except XV-421BK
DIGITAL OUT PCM/STREAM COAXIAL OPTICAL VIDEO OUT COMPONENT
Y PB PR
The unit
AV COMPU LINK
Digital equipment
S-VIDEO VIDEO
R L
AUDIO OUT
White White
IN
LEFT
IN
OPTICAL
Red
Audio cable (not supplied)
RIGHT
AUDIO
COAXIAL
DIGITAL
Red
NOTES
� When you connect the unit's DIGITAL OUT to digital audio equipment, before using, make the �DIGITAL AUDIO OUTPUT� setting in the �AUDIO� page of the preference display correctly according to the connected audio equipment. If the �DIGITAL AUDIO OUTPUT� is not set correctly, loud noise may be generated from speakers, causing damage to your speakers. See �DIGITAL AUDIO OUTPUT� on page 36. � With the digital connection, the unit�s settings for COMPRESSION and DOWN MIX in the AUDIO page of the preference display are invalid. Settings for these items must be made from the decoder.
To connect the power cord
When all the audio/video connections have been made, insert the smaller plug of the supplied AC power cord to the unit�s AC IN connector, then insert the other end to the wall outlet. Make sure that plugs are inserted firmly. The STANDBY indicator lights and setup is completed.
Getting
Warning
� � � � � Disconnect the power cord if you are not going to use the unit for a long time. Disconnect the power cord before cleaning the unit. Disconnect the power cord before moving the unit. Do not connect or disconnect the power cord with wet hands. Do not pull the power cord when disconnecting it, as this may damage the cord and cause fire, electric shock, or other accidents.
Caution
� Do not damage, alter, twist, or pull the power cord, as this may cause fire, electric shock, or other accidents. � To prevent any accidents or damages caused by an unsuitable AC power cord, only use the supplied power cord. If the cord is damaged, contact a dealer and get the new power cord. � Do not put anything heavy, or the unit, on the power cord, as this may cause fire, electric shock, or other accidents.
14
started
 $4.99 XV523GD JVC
Service Manual Complete service manual in digital format (PDF File). Service manuals usually contains circuit diagr…
|
|
|
> |
|