|
There are currently no product reviews.
 ;
Good product. All the information is invcluded, but due to the complexity of the amplifier, it still is difficult to get it to operation again.
 ;
Very professional seller; very fast, accurate and rielable service.
;
great works fine, got the manual on mail within a day
;
First class Service,
best quality, come again
Thank You.
vac
;
I didn't realise a manual for an early plasma TV such as the one we were gifted could be so easily obtained. No manual was supplied with it, and as senior citizens we were a little puzzled over some aspects of its use. I do not want a listing for your store credit as we are not fairly big computer users. The manual was well organised, as it should be, with its backing of the Pioneer name. The download was prompt and everything worked quite smoothly. Thank you. Gordon.
1
2
3
4
A
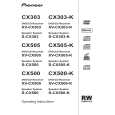
Removing the Traverse Mechanism Assy-S and 06SD Pickup Assy-S
1 06 LOADER Assy
1
Short-circuit point by soldering.
Note: After replacement, connect the flexible cable, then remove the soldered joint (open).
3
4
3
B
2 3 4
Disconnect the four connectors. Remove the two screws. Remove the 06 LOADER Assy.
06 LOADER Assy Rear view 06SD Pickup Assy-S
C
2 2
22
Note: Do not touch the bottom side of the 06SD Pickup Assy-S. If touched, the optical axis may be shifted.
1
DVD MAIN Assy
2 Bridge 04, Tray
D
1 2 3
Remove the one screw. Remove the bridge 04. Pull out the tray, then remove it by pressing the hook.
1 3
-2
2
Hook
E
Tray Bridge 04
3
Note when reinserting the tray
When reinserting the tray, first align the triangle printed on the loading base and the pin of the drive cam, then insert the tray.
-1
Drive cam
Pin
F
Front side Loading base Triangle
4
38
1 2
XV-CX505
3
|