|
|
|
Categories
|
|
Information
|
|
Featured Product
|
|
|
 |
|
|
There are currently no product reviews.
 ;
Perfect, complete manual, exactly what I needed. Recommended to everyone.
;
Very usefull manual. From my point of view there are needs more clearables images.
;
Once again owner-manual.com has saved the day for me, and come through with the manual I need. I looked other places too, and couldn't find it anywhere. Thank You owner-manual.com!!! You're the BEST!
;
very good quality that can be magnified several times, and it remains readable.
For sure I will return next time the need for a service manual arise.
;
The service manual is really great - thanks to it I was able to install the laser unit and thus "save" my CD-player, which seemed to be impossible before I had the manual.
1
2
3
4
A
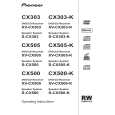
Removing the Traverse Mechanism Assy-S and 06SD Pickup Assy-S
1 06 LOADER Assy
1
Short-circuit point by soldering.
Note: After replacement, connect the flexible cable, then remove the soldered joint (open).
3
4
3
B
2 3 4
Disconnect the four connectors. Remove the two screws. Remove the 06 LOADER Assy.
06 LOADER Assy Rear view 06SD Pickup Assy-S
C
2 2
22
Note: Do not touch the bottom side of the 06SD Pickup Assy-S. If touched, the optical axis may be shifted.
1
DVD MAIN Assy
2 Bridge 04, Tray
D
1 2 3
Remove the one screw. Remove the bridge 04. Pull out the tray, then remove it by pressing the hook.
1 3
-2
2
Hook
E
Tray Bridge 04
3
Note when reinserting the tray
When reinserting the tray, first align the triangle printed on the loading base and the pin of the drive cam, then insert the tray.
-1
Drive cam
Pin
F
Front side Loading base Triangle
4
38
1 2
XV-CX505
3
|
|
|
> |
|