|
There are currently no product reviews.
 ;
Super Anleitung. Ordentliche Auflösung. Das ganze noch in Deutsch wäre zu schön. Alle Datenblätter sind sauber Kopiert und alle Leitungswege sind sauber ausgeführt
;
Thanks God for the internet and thanks for the service like this - proffessional solution on time.
;
About the service it's very fast and reliable. About the manual the quality is high enough to read even the tiniest details on the wiring diagrams so you can't ask much more than that, let it alone for a manual of a product from 20 years ago. Thank you, very satisfied.
;
The downloaded quality was as good as the orignial
 ;
This is a great and complete Service Manual for the Sharp GF8585HB. Giving full and detailed technical insight. Good to find these manuals online.
1
2
3
4
A
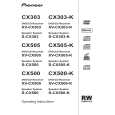
Removing the Traverse Mechanism Assy-S and 06SD Pickup Assy-S
1 06 LOADER Assy
1
Short-circuit point by soldering.
Note: After replacement, connect the flexible cable, then remove the soldered joint (open).
3
4
3
B
2 3 4
Disconnect the four connectors. Remove the two screws. Remove the 06 LOADER Assy.
06 LOADER Assy Rear view 06SD Pickup Assy-S
C
2 2
22
Note: Do not touch the bottom side of the 06SD Pickup Assy-S. If touched, the optical axis may be shifted.
1
DVD MAIN Assy
2 Bridge 04, Tray
D
1 2 3
Remove the one screw. Remove the bridge 04. Pull out the tray, then remove it by pressing the hook.
1 3
-2
2
Hook
E
Tray Bridge 04
3
Note when reinserting the tray
When reinserting the tray, first align the triangle printed on the loading base and the pin of the drive cam, then insert the tray.
-1
Drive cam
Pin
F
Front side Loading base Triangle
4
38
1 2
XV-CX505
3
|