|
There are currently no product reviews.
 ;
It was just what I needed. Thanks for your quick action and great price. You guys are top notch.
Thanks
 ;
Excellent manual, complete, great resolution, easy to read especially the schematics. Thank you !
;
Fast delivery, excellent resolution and complete. And above all, the best price ever !
;
Vielen Dank,
das war eine prima Sache. Habe das Serviceheft nach 3 Stunden herunterladen können. Qualität OK. Hat mir mit Erfolg bei der Fehlersuche und Reparatur meines
Nordmende Galaxy Mesa 9000 geholfen. Ich kann diesen Service bestens weiterempfehlen
A very good service.
Thank You!
;
everything i needed. it was easy to get. and this site is now my go to site for manuals.
1
2
3
4
5 Tray panel
A
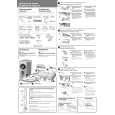
Firstly remove the tray panel to remove the mecha. section. In this section, explain a disassembly of the tray panel.
How to open the tray when the power cannot be on
Insert a screwdriver (small) into the slit located at the bottom of the unit, and slide the projection of the drive gear in the LOADING MECHA. Assy in the direction of the arrow, as indicated in the photo. If the tray pops out a little, fully pull it out by a hand.
1 2 3 4 5 6
B
Remove the top panel and top plate. (See Step ¥.) Press the STANDBY/ON button to turn on the power.
Press the 0 (OPEN/CLOSE) button to open the tray. Remove the tray panel. Press the 0 (OPEN/CLOSE) button to close the tray. Press the STANDBY/ON button to turn off the power.
Slit
26
4
C
Tray
35
Screwdriver (small)
3
5
Tray panel
7
Disassembly of after step 7, refer to "Step [ DVDM Assy" . Projection
Screwdriver (small)
D
Drive gear LOADING MECHA. Assy
E
F
108
1 2
XV-DV99
3 4
|