|
There are currently no product reviews.
 ;
This manual was exactly what I needed. Detailed, useful and delivered as promised.
 ;
Great manual good quality really helped in the repair of my Toshiba, thanks
;
Print was clear and easy to read. Thank you Joe joeoldaudio
;
Very great deal. In a few minutes a have the manual, that I needed. Thanl you very much
;
Manual was complete. Received it quickly. No problems
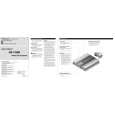
TH-V70 Removing the pre-amplifier board (See Figs. 4 to 6.)
Remove the rear panel. 1. Remove the two screws F attaching the volume bracket. 2. Disconnect the pre-amplifier board from the connector CN201 on the mother board and take out the pre-amplifier board. 3. Pull out the push button. 4. Remove the two screws G and nut attaching the volume bracket.
Volume bracket Heat sink
Mother board
F
Pre-amplifier board AC bracket
H H
Power transformer
Removing the power supply & SP terminal board (See Figs. 4 and 5.)
Remove the rear panel. 1. Remove the two screws H attaching the AC bracket. 2. Disconnect the power supply & SP terminal board from the connectors CN210 and CN211 on the mother board.
Pre-amplifier board Volume bracket
Fig.4
CN201
CN101
Mother board CN211
CN111
3. Disconnect the wire from connector CN107 on the power supply & SP terminal board. 4. Disconnect the power cord from connector CN108 on the power supply & SP terminal board.
Power supply & SP terminal board
CN210
CN110
CN108
CN107 Power cord
Fig.5
Volume bracket Nut
Pre-amplifier board
G
Push button CN101
G
Fig.6 1-17
 $4.99 XV-THV70 JVC
Owner's Manual Complete owner's manual in digital format. The manual will be available for download as PDF file aft…
|