|
There are currently no product reviews.
 ;
I'm very happy that you all are performing an incredible good job. Furthermore what you did is very useful for all people as me that have electronics as an hobby.Thank you!!!!!
;
Manual found fast and good quality, very helpfull service
;
8-17-12 Been using the sight for about 6 months. Fast Downloads and top quality
Manuels !
 ;
Everything was great, the manual, the response time, the simplicity of the order, and the
Price. The only thing that I could possible say on a negative note would be that the manual I ordered was more for a service tech. There were a lot of schematic diagrams that didn't help me solve the problem. However I would order again and recommend the web sight to others.
;
I'd been looking for this manual for awhile. Exactly what I needed - and at an excellant price. Thanks!
5
6
7
8
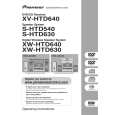
4 AMP Module L-2CH
1
the AMP module L-2CH can be removed without removing the RX module. (Shown as step �.)
A
2
Remove the two screws.
2
Chassis section
3 4 5 6 7
Remove the three screws. Remove the two push rivets. Remove the one screw. Put off the PCB angle for a while. After removing POWER ASSY by removing one screw, remove the AMP Module L-2CH by removing the three connectors. Barrier
3 3
4
3
B
2
Rear view
7 7 7 6 5 7 7
PCB Angle
C
Before shipping out the product, be sure to clean the following positions by using the prescribed cleaning tools: Position to be cleaned Fans Cleaning tools Cleaning paper : GED-008 AMP Module L-2CH
Able to input signals using the jumper wire for service. At that time remove the RX MOD ULE. (Refer to 7.1.3 DIAGNOSIS FOR AMP SECTION)
D
MAIN Assy
CN3305 CN3306
CN3304
REGULATOR Assy
CN3303
CN3301
E
CN3302
8 8
Jig Cable (GGD1335)
Connect the jig cable (GGD1335).
AMP Assy
Diagnosis
F
XW-HTD640
5 6 7 8
63
|