|
|
|
Categories
|
|
Information
|
|
Featured Product
|
|
|
 |
|
|
There are currently no product reviews.
 ;
This document is just what I was looking for, it´s very useful, it contains adjustment procedures for the final stage of the power amp and also
has a complete wiring diagram and description of the main semiconductors used in the design.
;
Dear Sirs,
Thank you for the fast support, the manual does provide all necessary information to repair the radio. All schematics are in a good quality for reading.
The manual fits 100% to my requirements as a technican.
Kind regards Thomas
;
the big video recorder format s-vhs many features delicate in loading system of the cassette. Such machines are no longer manufactured, it would be too expensive.
 ;
THIS MANUAL IS VERY GOOD AND VERY CLEAR
PLEASE NOTE IT DOES NOT CONTAIN THE SETUP INFORMATION TO ALIGHN THE GEARS IN THE CD MECH IT DOES SHOW ALL THE PARTS AND THEIR LOCATIONS .
;
Complete service and operation manual. All schematics are there, all circuit boards AND add-on boards. Including exploded views ,component names and specifications. Also electrical and mechanical adjustment procedures are in this manual. This manual also covers the more advanced BR-S811E unit. Scan quality is fair and usable.
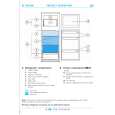
9. Drive motor disassembly
1 Remove the document table. 2 Remove the top cabinet. 3 Remove the bottom cabinet and remove the drum cartridge. 4 Remove the motor encoder sensor PWB and the encoder. 5 Remove the main chassis and remove the drive unit. 6 Remove the drive motor. (2 screws)
11. Lower heat roller disassembly
1 Remove the document table. 2 Remove the top cabinet. 3 Remove the bottom cabinet and the drum cartridge. 4 Remove the main chassis. 5 Remove the lower heat roller.
12. Heater lamp disassembly
1 Remove the document table and the top cabinet.
10. Power PWB disassembly
1 Remove the document table. 2 Remove top cabinet. 3 Remove the bottom cabenit and the drum cartridge. 4 Remove the main chassis. 5 Disconnect the connectors and the grounding cable (1 screw). 6 Remove the three fixing screws and remove the power PWB.
2 Remove the screw which secures the heater lamp terminal in the
rear side, and remove the heater lamp terminal.
3 Pull out the heater lamp from the rear side.
Note: Do not touch the glass surface of the heater lamp directly with your hand.
@
Note for assembly: When assembling, put the rating indication (e.g., 100V 600W) of the heater lamp towards the front side.
� 20 �
 $4.99 Z-26 SHARP
Owner's Manual Complete owner's manual in digital format. The manual will be available for download as PDF file aft…  $4.99 Z-26 SHARP
Parts Catalog Parts Catalog only. It's available in PDF format. Useful, if Your equipment is broken and You need t…
|
|
|
> |
|