I am very happy with the owner's manual. I bought a used Casio and was so relieved that I was able to get a hold of a owner's manual. It was very easy to download the manual and I had no problems with printing it. Thank you! Nancy Whalen
great site, the most easy and fastest way to find the manual you need, no 5 star because the manual was only available in german, but I speak german as well so no problem for me.
Text excerpt from page 15 (click to view)
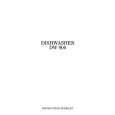
ADJUSTING THE MINIMUM FLAME IN THE OVEN BURNER
� Disconnect the oven from the electricity supply. � Remove the three knobs. � Remove the discharge grid by unscrewing the fixing screws (Fig. 23 - �A�). � Undo the two fixing screws under the control panel and remove it (Fig. 23 - �B�). � With a thin screwdriver adjus the oven tap by-pass pin (Fig. 24 - �C�). Converting the oven from natural gas to LPG, completely tighten the by-pass pin. When reverting the oven to natural gas, first completely tighten the by-pass pin, then unscrew it of about 3/4 of a turn. � Refit the parts by following the procedure backwards. � Connect the oven to the electricity supply. � Light the oven at the maximum positionand let it warm up with the door closed for about 10 minutes, then check that the oven burner does not go out when quickly turning the oven knob from the maximum position to the minimum position. If the oven burner goes out, repeat the whole procedure.
FO 1084