Exactly as described, the full user-manual (145 pages). Perfect.
Text excerpt from page 24 (click to view)
Installation
D C B
780
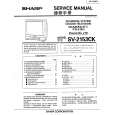
Positioning the Appliance (Fig. 1)
E
Note A: The appliance is designed to be flush fitted with 2mm clearance at each side to allow for it to be pulled forward for cleaning etc. Note B: The hotplate side trims should be flush with the cabinets and must not be below. Adjustable levelling feet at the front and rear are provided on the base of the appliance. Adjustment is obtained by rotating in or out, the feet at the front or rear of the appliance from the underside of the appliance. A spirit level should be placed on a cake tray on one of the shelves to confirm that the appliance is correctly levelled. The levelling feet fitted to the appliance will achieve a height to hotplate trims of 900mm-0 + 10.
115
A
FO 1141
420
Fig. 1
The appliance must be installed in accordance to the type X (standard EN 60335-2-6). Therefore the appliance can not be installed beside furniture higher than the cooker worktop.
Note C: If the appliance is fitted next to a side wall or cabinets above height of the hotplate trims, then a gap of 115 mm is required. Curtains must not be fitted immediately behind the cooker or within 115 mm of the sides of the cooker. Note D: Any wall cabinet or extractor must not be lower than 780mm above hotplate level. Note E: Wall cabinets may be fitted in line with the sides of the base units, providing that the lower edge of the wall cabinet is a minimum of 420mm above the worktop.