Whilst this is a photo copy, and some of the pages are a little askew, it was all readable and intact. A real bonus finding an old manual for a classic piece of kit that no other site had.
Great stuff.
Thanks to Owner-Manuals.com! This manual was exactly what I needed. As Amana was purchased by Maytag and later by Whirlpool, there was no way to receive it from their websites. I was lucky to find this resource.
Text excerpt from page 6 (click to view)
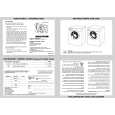
Türanschlagwechsel
Bevor Sie nachstehende Arbeitsvorgange durchführen, Netzstecker unbedingt aus der Steckdose ziehen. Gerät vorsichtig auf den Rücken legen. Unteres Scharnier und Schraubfuss abschrauben (1-2-3-4). Tür abnehmen. Oberen Scharnierstift (5) abschrauben und gegenüber montieren. Tür in oberen Scharnierstift einsetzen. Linken Stellfuss (Kunststoffteil) abmontieren und auf der rechten Seite anschrauben. Gleichzeitig auch die zwei Schrauben, die an der linken Seite die Befestigungslöcher des Scharniers verdecken, abnehmen. Scharnier um 180° drehen und mit Schraubfuss auf der linken Seite befestigen. Griff (6) abnehmen und auf der gegenüberliegenden Seite befestigen. Achten Sie darauf, dass alle Distanzscheiben und Unterlagen wieder an den gleichen Stellen eingesetzt sind. Achtung Nach Ausführung des Türanschlagwechsels kontrollieren Sie, ob die Türdichtung am Schrank haftet. Bei einer niedrigen Raumtemperatur (z.B. im Winter) kann es vorkommen, dass die Dichtung nicht perfekt am Schrank haftet. Die Wiederherstellung der Dichtung erfolgt automatisch nach einer gewissen Zeit. Wollen Sie aber diesen Prozess beschleunigen, so genügt es die Dichtung mit einem Fön zu erwärmen.
D193/B