This GRUNDIG UV5A Owner Manual is not only an instruction manual but a total functional circuit description of the Multimeter and includes circuit diagram at the end pages. It is very helpful for repairing and calibrating the instrument. It is written in two languages English and German for international support. It was very easy to repair my unit with this document. Regards, Regis Pauly, Electrical Engineer.
The owner's manual was evetything I thought it would be. I was able to print it out using both sides of the paper in quick order, saving me a search online for a used one.
Was happy to find the complete owners manual... It's all in there, just like the original...
Text excerpt from page 7 (click to view)
DOOR REVERSIBILITY
Unplug the appliance from the power supply before carrying out the below-mentioned operations. Remove the ventilation grill (D). Unscrew the bottom hinge (E). Remove the freezer door by releasing it from the middle hinge (H). Unscrew the middle hinge. Remove the fridge door by releasing it from the top hinge pin (A).
D640
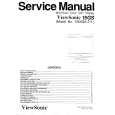
Fig. 4
E F F D F
F
Remove the pin and the washer (A+B) from the top hinge (C), then mount these on the opposite side, after having removed the plugs which must be re�tted on the other side. Re�t the fridge door. Replace the middle hinge to the left hand side. Replace the freezer door. Screw down the bottom hinge (E) on the opposite side by using the screws previously removed.
D427
Fig. 5
C B A
Remove the plug (F) from the ventilation grill (D) and replace it on the opposite side. Re-assemble the ventilation grill (D). The doors can be aligned by adjusting both the middle and top hinges. The middle hinge can be adjusted horizontally, with the help of a tool, after having slackened the two screws. The top hinge is adjusted by slackening the nut with a 10 mm spanner and then proceeding as shown in the Figure. Warning: After having reversed the opening direction of the doors check that all the screws are properly tightened and that the magnetic seal adheres to the cabinet. If the ambient temperature is cold (i.e. in Winter), the gasket may not �t perfectly to the cabinet. In that case, wait for the natural �tting of the gasket or accelerate this process by heating up the part involved with a normal hairdrier.
D405