Thank you for having the manual I needed for an older model Aiwa stero I had found on Ebay --- I wanted the Aiwa because I had tapes and cd's but I did not have a manual as to how to operate the system... I found what I needed and it has enabled me to set the system up for my enjoyment.
I wished detailed information of the JBL S310 and here I found it! Very happy with the service from this site!
Text excerpt from page 5 (click to view)
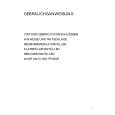
2 - Fitting the fixing elements a) Insert the rawl plugs provided into holes 1 and 2. b) Fit the eye bolts O (fig. 6). c) Fix the wall bracket S in hole 2 using the screw V provided (fig. 7). 3 - Fitting the hood canopy C to the 6 7 wall S a) Remove the metal grease filters 2 and the activated charcoal filter, 1 if there is any (see the paragraph on Maintenance). V mm b) Fit the support rod B using the 44 L= O two screws K (3,5x9,5) provided A08_07 (fig. 8). c) Hook the hood canopy C to the eye bolts 8 O fixed in holes 1 (fig. 9). d) Adjust the support rod B so that it pushes against the wall (fig. 10). e) Adjusting position (fig. 11). There are two adjustable hooks at the rear of the hood, which can be used to adjust its position as K B follows: - Turn the screws L until the position of screws N coincides with the lower access holes. - Turn the screws N to adjust the vertical and A03_08 horizontal position of the hood. - Lock the screws L to fasten the hood against the wall. - Insert the plugs T provided in the holes giving access to screws N.
A08_06