Please tell us what you think and share your opinions with others. Be sure to focus your comments on the product. You will receive $2.00 of store credit for Your review.
Please tell us what you think and share your opinions with others. Be sure to focus your comments on the product. You will receive $2.00 of store credit for Your review.
Having bought a pre-owned Sony FM stereo tuner through eBay, it came without any manuals. It soon became clear that to get the best from this excellent tuner I needed a decent manual because much of the operation was not intuitive to a newboy to hi fi like me. I managed to download the official Sony multi-lingual manual from Owner-Manuals.com with no problem at all - a really quick and easy service. I'm very glad I did because I found out all the operations of the tuner and was then able to not only set it up quickly but also to get much more from it that poke-and-hope trialling would ever achieve. In my book $4.99 very well spent.
Text excerpt from page 15 (click to view)
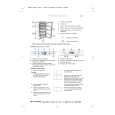
Fitting the Hood Body
Before starting to fix the hood body, tighten the two screws Vr located on the top of the hood body. Hook the hood body onto the two 4.2x44.4mm screws item 12a. Fully tighten the screws item 12a. Using a screw driver and spirit level, adjust the screws item Vr until the hood body is level.
Vr
12a
Extraction
The cooker hood is more effective when used in the extraction mode (ducted to the outside). Venting kits may be purchased through your retailer or DIY store, and must be ducted to an outside vent of �125mm (5�) or �150mm (6�). The ducting used must be manufactured from fire retardent material conforming to the relevant British Standard or DIN 4102-B1. When the cooker hood is ducted to the outside the charcoal filter must be removed.
Recirculation
The cooker hood is supplied specified for use in the recirculation mode, with the charcoal filter fitted. In the recirculation mode contaminated air is passed through the charcoal filter to be purified and recirculated into the kitchen through the grille outlets on either side of the chimney. To assemble the recirculation duct, place the recirculation outlet connection item 15 into the support item 7.3. Insert the extension ducts item 14.1 into either side of the recirculation outlet item 15 ensuring the connections are vertically and horizontally aligned with the outlets in the chimney. Connect the recirculation oulet item 15 to the outlet on top of the hood body using either a piece of �125mm or �150mm flexible or rigid pipe. Rigid pipe is strongly recommended and should be used where possible as this will ensure the best performance while lowering noise.