Finding the owners manual for my Pioneer CRWM62R is greatly appreciated. I had searched several other web sites with no success. Although my manual was not listed on your site for immediate download, I recevied an email within a few hours that my ower's manual was posted for me. I had no difficulty downloading the manual for my 20 year old multi-cassette player. Owner Manuals provides a service that is valuable, easy-to-use, accurate , efficient, and priced fairly. I thank you.
Came in the mail within a few hours. Gave clear instruktion on maintaines. Is of great use to have this manual in house
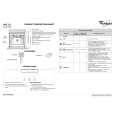
Text excerpt from page 13 (click to view)
Drilling the Ceiling/Support Shelf
Using a plumb line mark the centre point of the hob on the ceiling or support shelf. Position the drilling template item 21 on the ceiling or support shelf ensuring the template is aligned correctly with the angles of the hob. Mark the hole centres. Pilot drill the fixing holes at the points marked for the approprate size rawl plugs and screws (not supplied). It will also be necessary to drill a �10mm hole for the mains cable and the ducting if the hood is to be installed ducted to the outside.
Fixing the Frame
IMPORTANT: Before fixing, separate the Upper Chimney section 2.1 and the Lower Chimney section 2.2 from the frame by removing the screws 12c. Then separate the two sections of the frame by unscrewing the 8 screws located on each side of the frame.
Upper Frame
Feed the mains cable through the frame and the hole in the ceiling or support shelf. Fix the Upper Frame 7.1a to the ceiling (screws not supplied).
Lower Frame
Fix the lower frame using the 8 screws removed earlier and adjust the length according to the installation height (the minimum distance before fitting the hood body 1 must be 710mm). When the hood is to be installed in the recirculation mode, position the frame in the direction you want the recirculated air to pass into the kitchen. The frame mountings must be secure enough to withstand the weight of the cooker hood and any knocks the hood may get through normal ware and tear. 12