perfect! you just sent to me the copy in Italian witout even my specification!!!! so you are really smart cooperative and efficient. To my opinion the best place all over to get a manual of electronics!!!!
Great manual, would not have been able to operate my machine without it!!
James Dawson August 18, 2012
Text excerpt from page 18 (click to view)
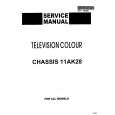
Place guide (Ha) on the inside part of the furniture door, up and down as shown in the figure and mark the position of external holes. After having drilled holes, fix the guide with the screws supplied.
ca. 50 mm
90°
21 mm
90°
ca. 50 mm
21 mm
Fix cover (Hc) on guide (Ha) until it clips into place
Ha
Hc
PR33
Open the appliance door and the furniture door at 90°. Insert the small square (Hb) into guide (Ha). Put together the appliance door and the furniture door and mark the holes as indicated in the figure. .
8mm
Ha Hb
8mm
PR167
Remove the brackets and mark a distance of 8 mm from the outer edge of the door where the nail must be fitted (K).
K Ha
Place the small square on the guide again and fix it with the screws supplied. Should the lining up of the furniture door be necessary, use the clearance of slots. At the end of operations, it is necessary to check if the door of the furniture closes properly.
Hb
PR168