Having purchased a 1994 Kenwood music system from a Charity shop in 2013 (it was a high end product in its day), I found myself not quite knowing where to plug in what, and how to do this, that and the next thing. I needed a Manual, and after failure with another online 'Manual provider' I found Owner Manuals dot com. Well, I wasn't sure, but it was only $5, and if things didn't work out, I wouldn't have lost much...
But things DID work out. After paying my childrens inheritance money, $4.99, I was sent a Manual for my Kenwood System very quickly. Alas, it was in German, and being Scottish, I could not read it or get my system in order from it...a rapid email to them brought the English Manual in short order, and my retro-system was and IS up and running in it's regulation settings.
I am very grateful to http://www.owner-manuals.com for their quick service and for even having such an obsolete Manual in the first place! If you need a Manual for ANYTHING, try here first. I wouldn't be surprised if I bought a 1928 Marconi radio, and got the user Manual for THAT here too!
Top marks.
John Copeland
Glasgow
Scotland
I was so happy that the owner's manual was available. It is well written and helped me to use the radio/CD player/recorder without problems. Thanks for making it available.
Irene Lambert
Excellant!!! Very quick and easy....Best $4.99 I have spent in a very long time..
I highly recommend this.
Text excerpt from page 7 (click to view)
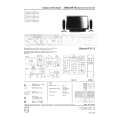
Press in the joint covers between the appliance and the kitchen furniture.
Fig. 6
D098
Apply covers (B) on joint cover lugs and into hinge holes.
Fig. 7
B
D096
Position the runners (H) at the top and bottom of the inside of the kitchen unit as shown in Fig. 8 and mark the position of the external holes. After preparing the holes, screw the runners to the kitchen unit door using 3.5x16 mm screws.
Fig. 8
H
20m
m
D094
Open both the appliance door and that of the kitchen unit to approx. 90°. Place the little plates over the runners. Hold the doors of the appliance and the unit together and mark the holes.