Actually, I was looking for this information for 3 years!...now thanks to you, the manual is on my hands and of great help, cause I understand now where I was doing wrong connections and wires...excellent, I'll be back to you if in need, thank you.
This manual covers the main equipment features only. While it also includes the procedure for saving and loading from the now long obsolete memory cards it does not mention the how to operate with the optional floppy drive interface so I am still at a loss about how to use this! Note that there is a separate manual covering the MIDI interface and programming via the keyboard, not included in this download. You will also need to get hold of this if you want to use the MIDI interface properly. Basically there is little difference between this manual and the free to download manual for the similar PR60 model.
Good list of manuals. I found a very rare one and easily get. Should be promptly to download, as we must to wait hours even after confirmed payment.
Text excerpt from page 5 (click to view)
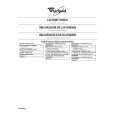
Intrerupator si indicator unitar
A se vedea capitolul Punerea in functiune, Controlul temperaturii si Congelarea pentru instructiunile de utilizare ale intrerupatorului si indicatorului unitar.
!
RO
S
5 4 3 2 1 5 4 0 0
6
6
1 2 3
A
BC
D
E
F
G
S
6 5 4 3 0 0
1 2
6 5 4
3
1 2
Minuirea aparatului
Punerea in functiune
Introduceti stecherul in priza. Se activeaza ledulverde, ceea ce inseamna ca aparatul functioneaza. Frigiderul: Pentru a declansa refrigerarea rotiti butonul pentru controlul termostatului spre partea dreapta a compartimentului de la "0" in sensul acelor de ceasornic. In pozitia "0" frigiderul nu functioneaza. Congelatorul: Rotiti butonul pentru controlul in directia acelor de ceasornic. In acest moment se activeaza ledul rosu, porneste compresorul, iar refrigerarea va incepe in scurt timp. In pozitia "0" congelatorul nu functioneaza. Atunci cand ledul rosu se dezactiveaza, temperatura are o valoare corespunzatoare, iar aparatul este corespunzator pentru stocarea alimentelor congelate si puternic congelate.
Parti componente: A) Ledul rosu Acest led se activeaza in functie de temperatura din interiorul congelatorului. Acesta lumineaza pentru o perioada scurta de timp in momentul cand se porneste congelatorul, cand se pun in el alimente proaspete in acesta si cand butonul termostatului congelatorului a fost comutat spre o temperatura mai joasa. Ledul lumineaza continuu cand temperatura in interiorul congelatorului este prea mare (supraincarcare cu alimente calde, usa ramane deschisa sau garnitura usii nu se inchide corect) sau congelatorul nu functioneaza corespunzator. B) Ledul galben Atunci cand intrerupatorul (c) este activat ledulindicator se activeaza. C) Intrerupatorul pentru functionarea continua (congelarea rapida) Atunci cand intrerupatorul congelatorului este activat compresorul congelatorului functioneaza continuu si in acestmod furnizeaza temperatura scazuta necesara in interior care este necesara pentru congelare. Atunci cand intrerupatorul este oprit termostatul controleazafunctionarea congelatorului. D) Ledul verde Acest led este aprins tot timpul cand aparatul functineaza. E) Butonul de comanda a temperaturii congelatorului Acesta este pentru stabilirea si modificarea temperaturii din interiorul congelatorului. F) Ledul verde Acest led este aprins tot timpul cand aparatul functineaza G) Butonul pentru controlul termostatului frigiderului Acest buton este pentru setarea si modificarea temperaturii din interiorul frigiderului.
Controlul temperaturii, setarea
Sistemele de control ale termostatului intrerup automat functionarea aparatului pentru mai mult sau mai putin timp, in functie de setare, apoi il pun din nou in functiune asigurand temperatura dorita. Frigiderul Puteti alege intre mai multe pozitii de racire. Cifrele de pe butonul termostatului sunt informative siva ajuta sa reglati in pozitia cea mai potrivita. Regland butonul de control al termostatului in pozitia 3, temperatura dezvoltata este intre 0 °C si +5 °C. Rotind butonul de control spre cifrele mai mari, racirea devine din ce in ce mai intensa, in caz contrar zonele racite vor fi din ce in ce mai calde. Congelatorul Sistemul de control al termostatului congelatorului este plasat pe rama capacului. Temperatura dorita poate fi reglata intre anumite limite conform figurii, prin rotirea butonului termostatului. Rotirea butonului se poate face de exemplu cu ajutorul unei monede. In aparat poate fi atinsa o temperatura de -18 °C saumai scazuta daca butonul termostatului este reglat conform figurii. Rotirea butonului de control in sensul acelor de ceasornic asigura temperaturi mai joase, rotirea lui in sens invers acelor de ceasornic asigura temperaturi mai inalte. Temperatura care se dezvolta in aparat depinde nu numai de pozitia butonului de control al termostatului, ci si de 31