I AM HIGHLY IMPRESSED BY THE EASE OF USE OF THIS DOWNLOAD SERVICE. INSTRUCTIONS ARE CLEAR AND SIMPLE TO FOLLOW....EVEN BY TECHNOPHOBES SUCH AS MYSELF. THE EMAILS POINT YOU IN THE RIGHT DIRECTION...ITS SO EASY PEASY. THE DOWNLOAD CHOICE OF USER MANUALS IS EXTENSIVE AND I COULD NOT FIND A CHEAPER OR MORE EFFICIENT SERVICE ON THE INTERNET. I COULD NOT HAVE MADE A BETTER CHOICE OF INFORMATION PROVIDER. SHOULD I EVER NEED ANOTHER USER MANUAL, THEN THIS IS THE FIRST CHOICE SITE. COULD NOT BE BETTER PLEASED!!!!!!!...MANY THANXES FROM JIM BURNS
I was impressed with the quality of service (frequent e-mails to let you know the status of your order), and the speed at which the download became available. The manual was a life saver and was not easy to track down. Thank you for such an excellent service.
the manual was just what i wanted it had all the revelent information required to operate the hifi .Iwould use any manual i downloaded for any item which needs a manual
GOOD SERVICE MANUAL GOT ALL THE INFO. THAT I NEEDED..
Text excerpt from page 9 (click to view)
Geräteunterbau
3. Plattenhalter und Gehäuseschraube vorne rechts und links abschrauben. 4. Plattenhalter und Schrauben zusammen mit Arbeitsplatte aufbewahren.
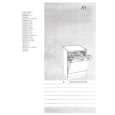
Einbau und Befestigung durchgehender Arbeitsplatte
an
Das Kältegerät kann unter einer durchgehenden Arbeitsplatte eingebaut werden. Hierzu muss die Arbeitsplatte auf dem Kältegerät abgenommen werden (siehe Arbeitsplatte abnehmen). Die minimal erforderliche Höhe bis zur durchgehenden Arbeitsplatte beträgt 820 mm. Zur Sicherstellung einer einwandfreien Be- und Entlüftung ist in der Arbeitsplatte hinten eine Luftaustrittsöffnung von mindestens 200 cm2 vorzusehen. Die Schnittflächen der Arbeitsplatte mit geeigneten Mitteln versiegeln (z.B. Lack) um ein Aufquellen bei Feuchtigkeitseintritt zu vermeiden. Der Abstand des Kältegerätes zur Wand muss min 30 mm betragen. Bauteile des Kältegerätes wie Kompressor und Verflüssiger dürfen zur Vermeidung von Geräuschen nicht an der Wand anliegen.
Arbeitsplatte abnehmen
Vor dem Einbau gegebenenfalls Türanschlag wechseln (siehe Türanschlagwechsel) Das Gerät vorsichtig in die Nische einschieben. Darauf achten dass die Netzanschlussleitung nicht eingeklemmt wird. Wandabstand überprüfen (siehe Einbau unter einer Arbeitsplatte). Das Gerät durch Ein- oder Herausdrehen der beiden Verstellfü�e vorne ausrichten und damit einen festen Stand gewährleisten. Mit einer geeigneten Schraube (Wahl je nach Beschaffenheit der Arbeitsplatte und des Abstandes Gerät zur Arbeitsplatte, nicht im Lieferumfang) das Gerät durch das obere Türscharnier unter der Arbeitsplatte befestigen. Hierbei bedarfsweise den Zwischenraum zwischen Türscharnier und Arbeitsplatte mit einer geeigneten Zwischenlage (Kunststoff oder Holz, nicht im Lieferumfang) ausgleichen. Hierdurch wird ein Verbiegen des Türschrniers und mögliche Funktionsstörungen der Tür verhindert. Nach dem Türanschlagwechsel unbedingt überprüfen, dass die Türdichtungen einwandfrei am Gehäuse anliegen und alle Schrauben kraftschlüssig angezogen sind.
Zum Abnehmen der Arbeitsplatte bitte wie folgt vorgehen: 1. Befestigungsschrauben hinten rechts und links herausdrehen. 2. Arbeitsplatte vorn leicht anheben , ca 20 mm nach hinten schieben und vorn nach oben abheben. 9