Correct manual received and of good quality but the contents of the file for the Service Manual for the same monitor is for a 20" TV not the RGB Monitor.
The owners manual for the Pioneer VSX-D603S was exactly what I needed. I received it in a timely manor and it was priced fairly. I definately will use your servise again. Thank You
This is a great manual. It was easy to read and very accurate. The size of the manual is small so email is no problem. I highly recommend it. The manual is very hard to find other than this website.
Whilst this is a photo copy, and some of the pages are a little askew, it was all readable and intact. A real bonus finding an old manual for a classic piece of kit that no other site had.
Great stuff.
Text excerpt from page 17 (click to view)
Electrical connection with the hob
This oven can only be connected to hobs indicated in the paragraph "Technical data". The socket for connecting the hob is located at the top of the oven cabinet. The hobs come complete with connecting leads for the hot plates/heat areas and ground cable; these leads feature plug-in connectors. Connection of the hob to the oven is carried out by plugging-in these connectors to the corresponding oven socket. The plug-to-socket connection design is such as to prevent possible wrong plugging-ins. The Manufacturer disclaims any liability in case these accident-preventing rules are not observed.
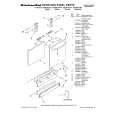
Fig. 13
550 MIN
560 -
80÷10
570
0
Building-in
To ensure correct operation of the built-in assembly, the kitchen cabinet and the recess for the built-in appliance must have suitable dimensions. When the appliance is fitted-in, there must be no open spaces left and it must be closed on all sides by the kitchen furniture to prevent the possibility of inadvertently touching �live� (current carrying) parts of the oven. All parts ensuring such a protection, including any covering panel (for instance, if the appliance is installed at the end or at the beginning of a kitchen counter) must be fastened in such a way as to prevent removal of the same without the aid of some tool. This appliance can be placed with its back and with one side close to appliances or walls of higher height. The other side, instead, must be placed close to furniture or appliances, having the same height.
Fig. 14
Fig. 15
Building-in under a kitchen counter
The recess must have the dimensions shown in Fig. 14. Before carrying out the buildingin of the oven, connect it to the hob (see corresponding chapter); then recess completely the oven under the counter; open the oven door and secure the oven to the kitchen cabinet with four wood screws which are to fit exactly into the holes provided for the purpose on the oven frame (Fig.15).