Very clear scan, I recommend it. Definitely a must have for any 3362 owner.
Alpine could have written a slightly more complete manual, though. It's already pretty huge, but the unit has so many functions, I feel some more explanation would have been better.
Yamaha's manual of their comparable YDSP-1 is a little better in my opinion.
Correct manual received and of good quality but the contents of the file for the Service Manual for the same monitor is for a 20" TV not the RGB Monitor.
Text excerpt from page 7 (click to view)
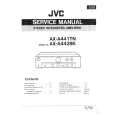
Lay the panel face down (Fig. 6). Position the top bracket on the panel, making sure that there is an equal distance between it and the sides and that its distance from the top edge is equal to distance (A) less 1 cm. Secure the bracket with the screws supplied. Take care not to damage the front face of the panel whilst working.
Fig. 6
=
=
A
-1cm
D468
Insert the adjusting pins (B-Fig. 7) into their locations in the door and screw them in.
B
Fig. 7
D532
Hook the decorative panel onto the top part of the door, inserting the pins (B) (on the door) into the elongated holes (1) (in the top bracket fitted to the panel) (Fig. 8). Insert the securing screws (C) through elongated holes (2) and fix the panel without tightening the screws (Fig. 8).
1 B C
Fig. 8
D533
2
Once the top of the panel has been correctly positioned, fix it through the holes in the bottom bracket, without tightening the screws (Fig. 9).