I AM HIGHLY IMPRESSED BY THE EASE OF USE OF THIS DOWNLOAD SERVICE. INSTRUCTIONS ARE CLEAR AND SIMPLE TO FOLLOW....EVEN BY TECHNOPHOBES SUCH AS MYSELF. THE EMAILS POINT YOU IN THE RIGHT DIRECTION...ITS SO EASY PEASY. THE DOWNLOAD CHOICE OF USER MANUALS IS EXTENSIVE AND I COULD NOT FIND A CHEAPER OR MORE EFFICIENT SERVICE ON THE INTERNET. I COULD NOT HAVE MADE A BETTER CHOICE OF INFORMATION PROVIDER. SHOULD I EVER NEED ANOTHER USER MANUAL, THEN THIS IS THE FIRST CHOICE SITE. COULD NOT BE BETTER PLEASED!!!!!!!...MANY THANXES FROM JIM BURNS
I was impressed with the quality of service (frequent e-mails to let you know the status of your order), and the speed at which the download became available. The manual was a life saver and was not easy to track down. Thank you for such an excellent service.
the manual was just what i wanted it had all the revelent information required to operate the hifi .Iwould use any manual i downloaded for any item which needs a manual
Die gewünschte Bedienungsanleitung wurde vereinbarungsgemäß in deutsch bereitgestellt. Sie ist gut lesbar. Kein Kauderwelsch.
Danke für den Service.
Text excerpt from page 18 (click to view)
Should the lining up of the furniture door be necessary, use the clearance of slots. At the end of operations, it is necessary to check if the door of the furniture closes properly.
PR168
Fix cover (D) on guide (B) until it clips into place.
B
D
PR167/1
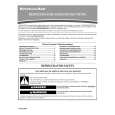
Fitting the plinth
Important For the efficient operation of the appliance, it is important that the original ventilation grid is used.
S.I.007
s
s
For an opening height dimension A=820 mm and a plinth height dimension a=100 mm, the plinth may be fitted without adjustments. The same applies to an opening height dimension B=870 mm and a plinth height dimension b=150 mm. For plinth heights greater than a=100 mm, b=150 mm, a cut should be made in the plinth, 580 mm wide, in the centre of the appliance position, leaving a remaining height of a=100 mm, b=150 mm. Attach plinth to the kitchen units.
A = 820 B = 870
a = 100
580
s
25 ÷
80
25
S.I.008
Important The plinth must be positioned at a minimun distance of 25 mm from the door.